Black Holes and Other Hoofwall Invasions
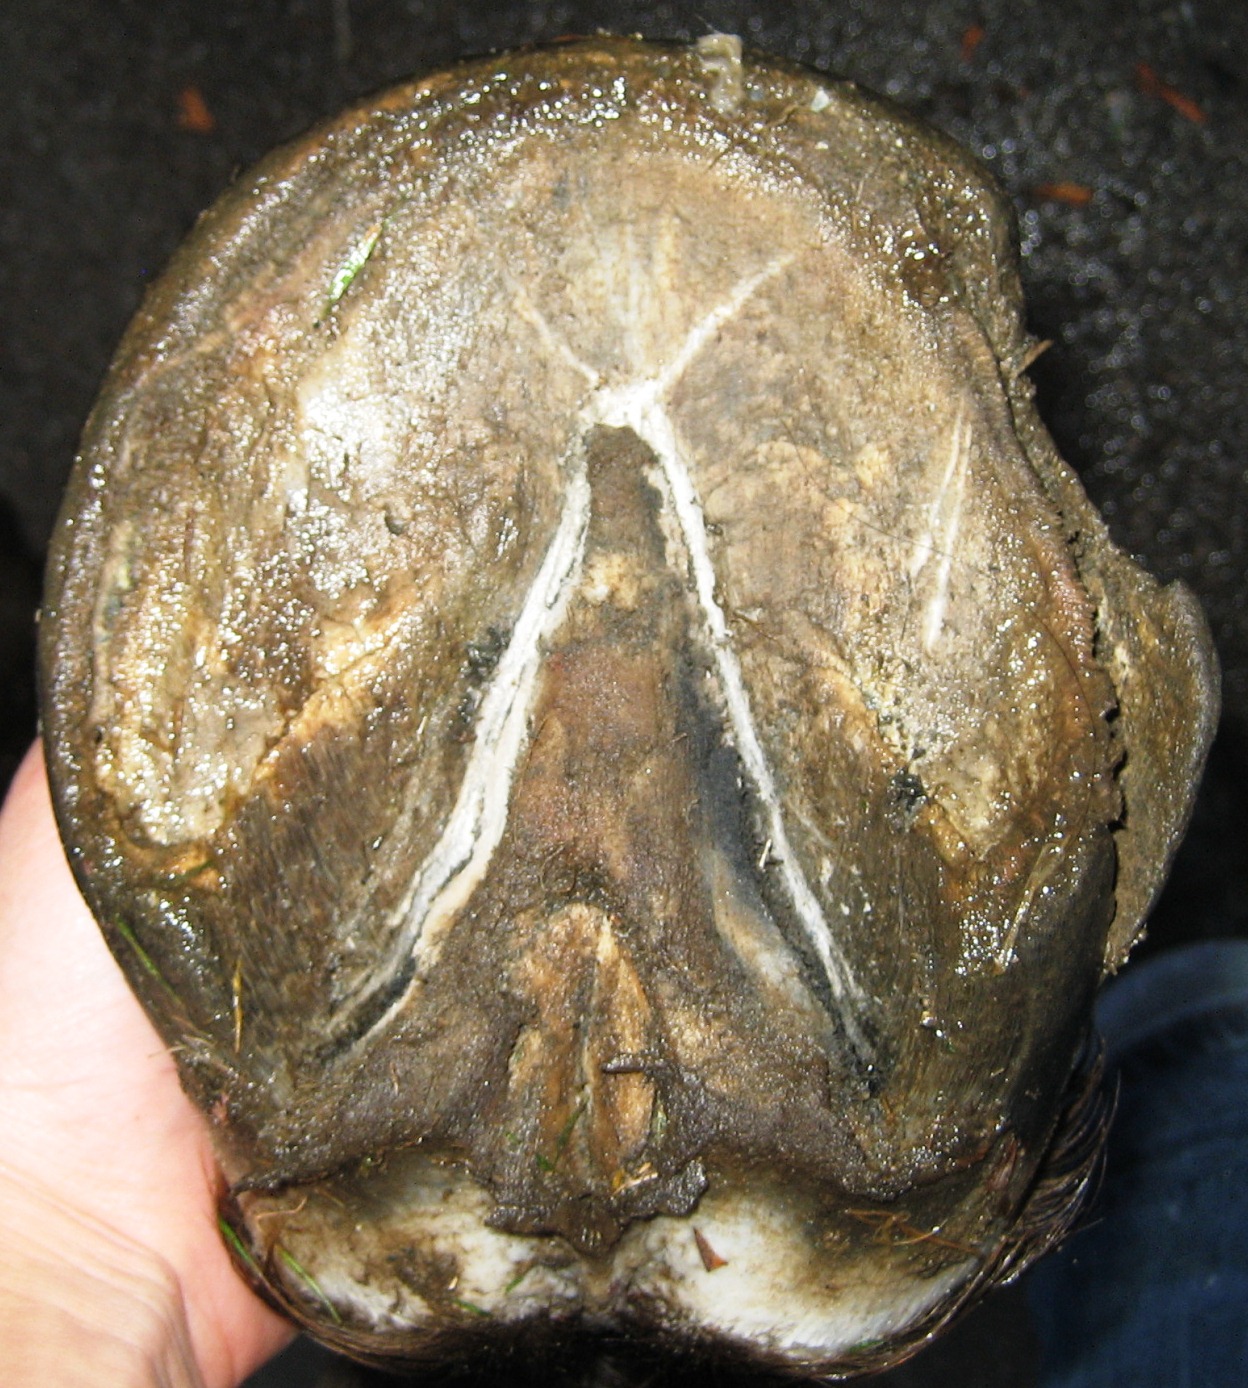
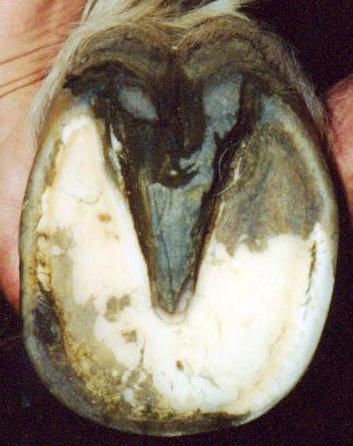
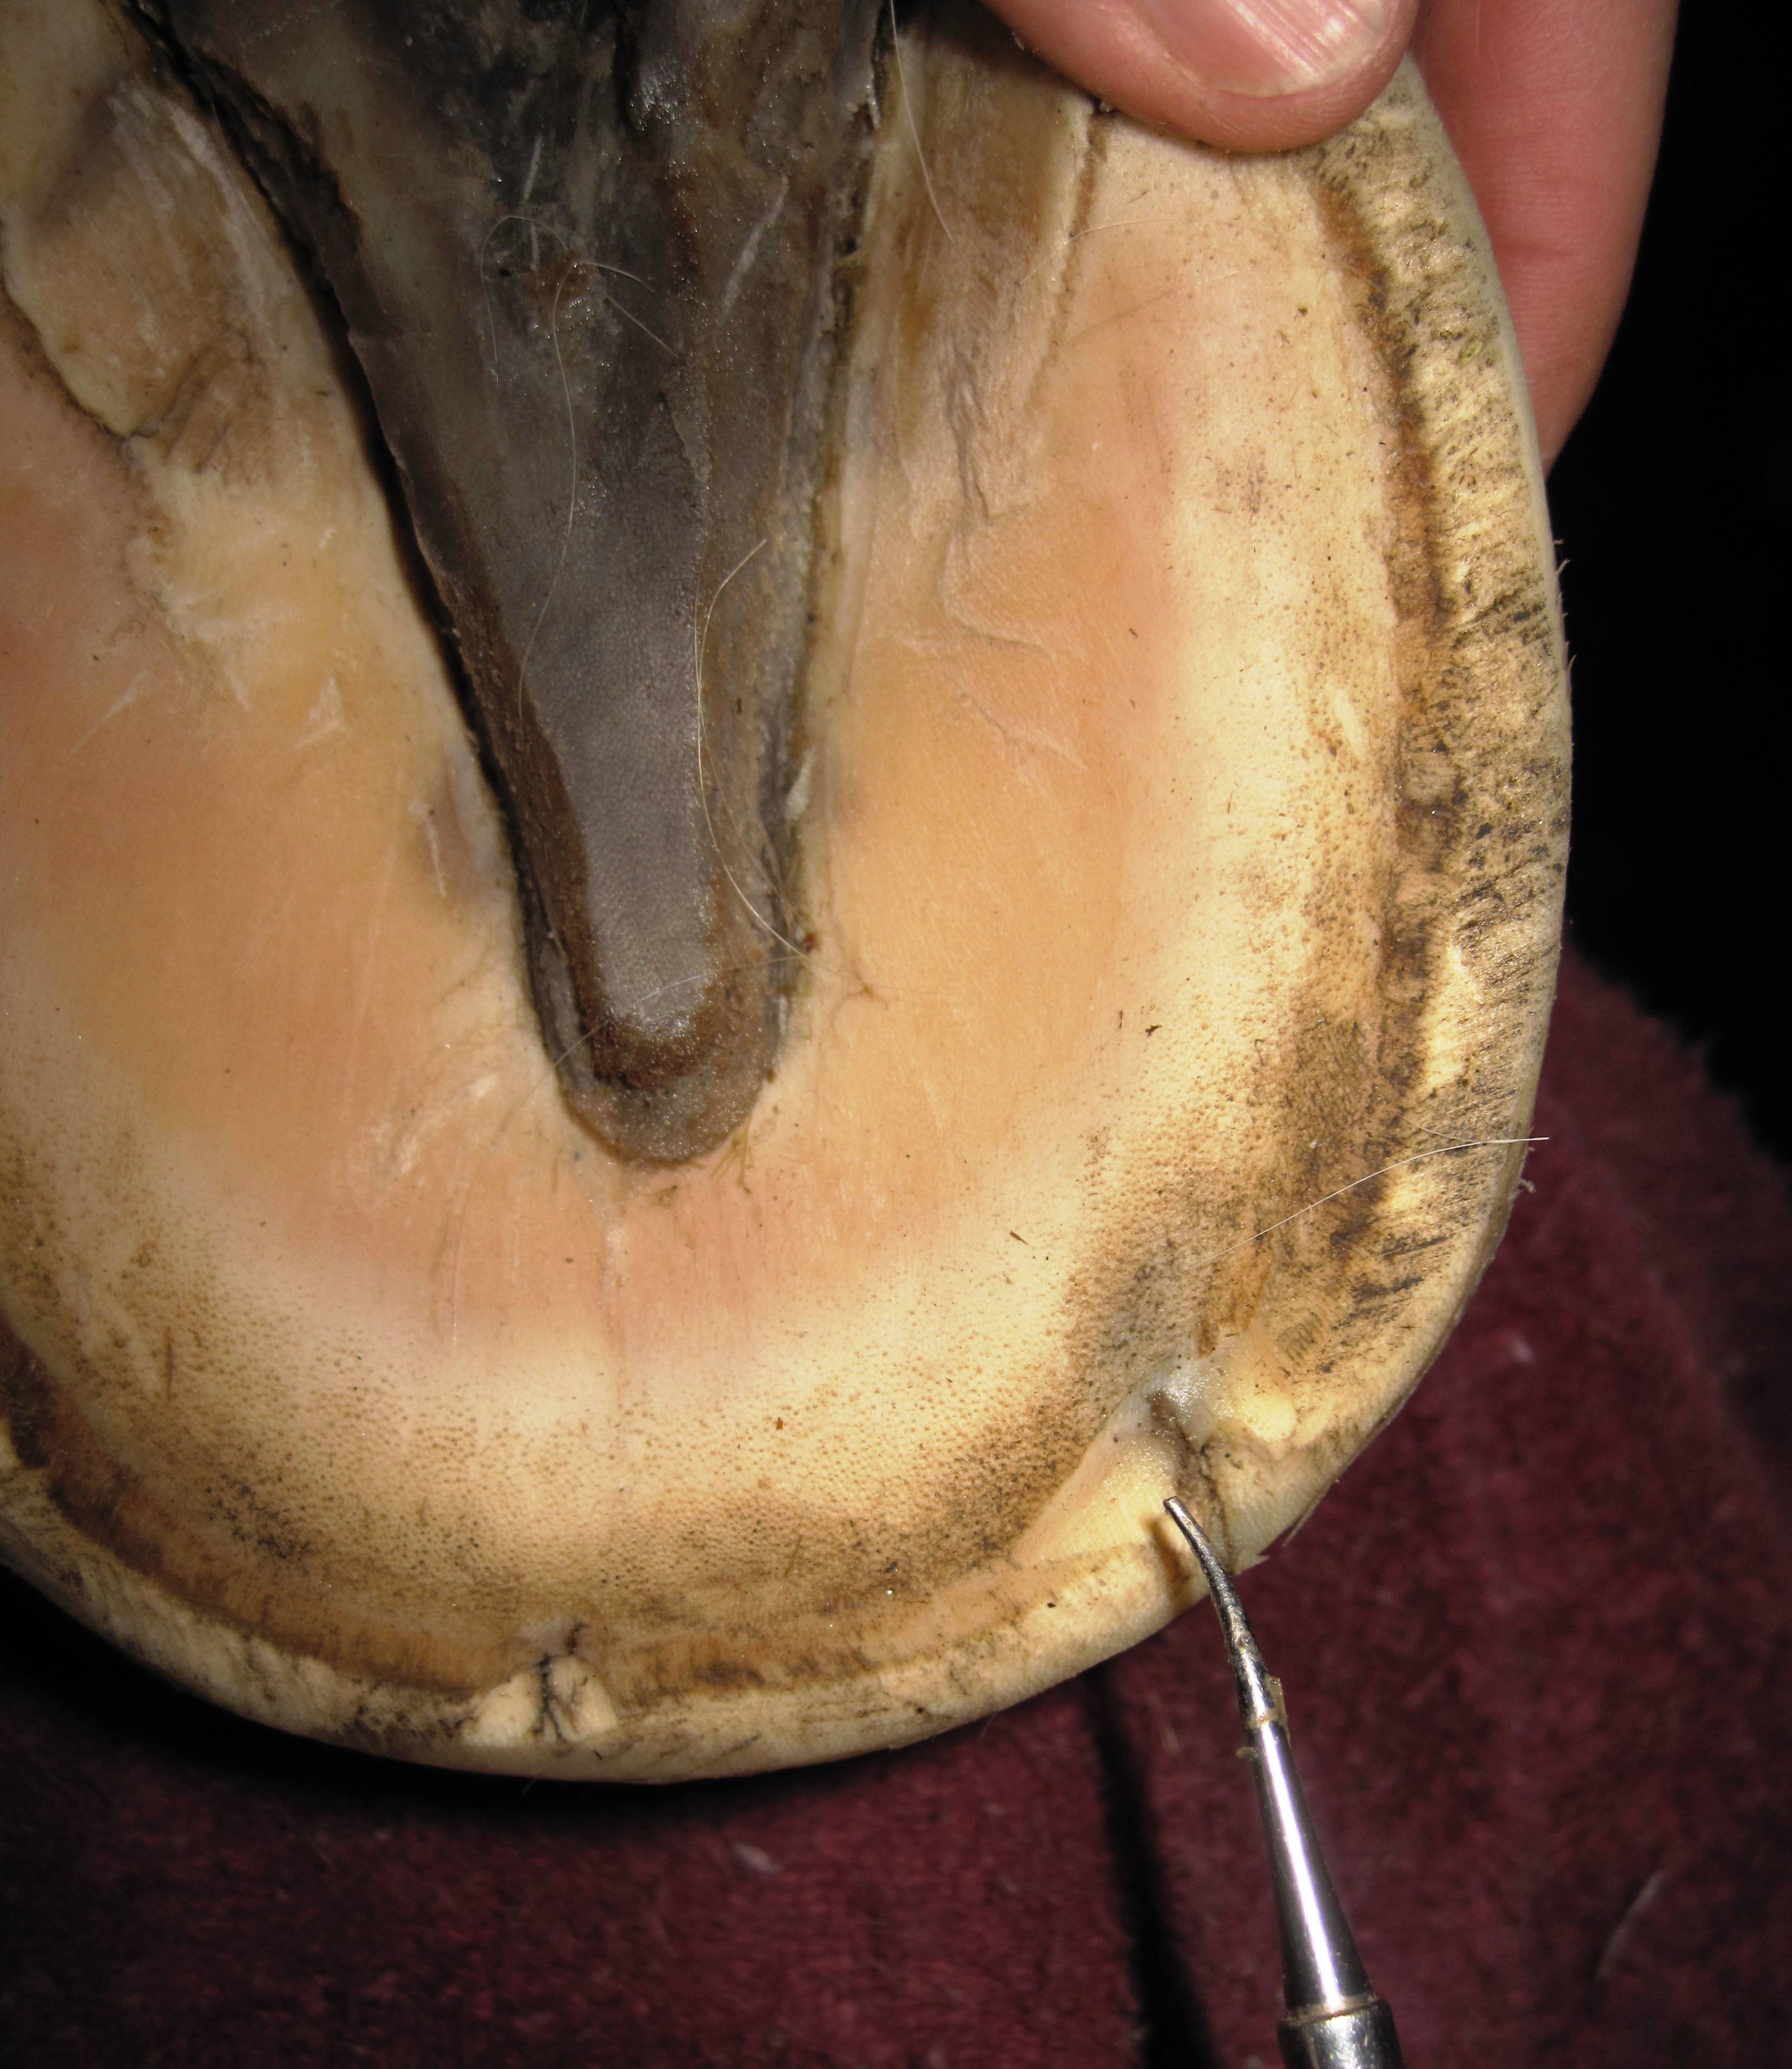
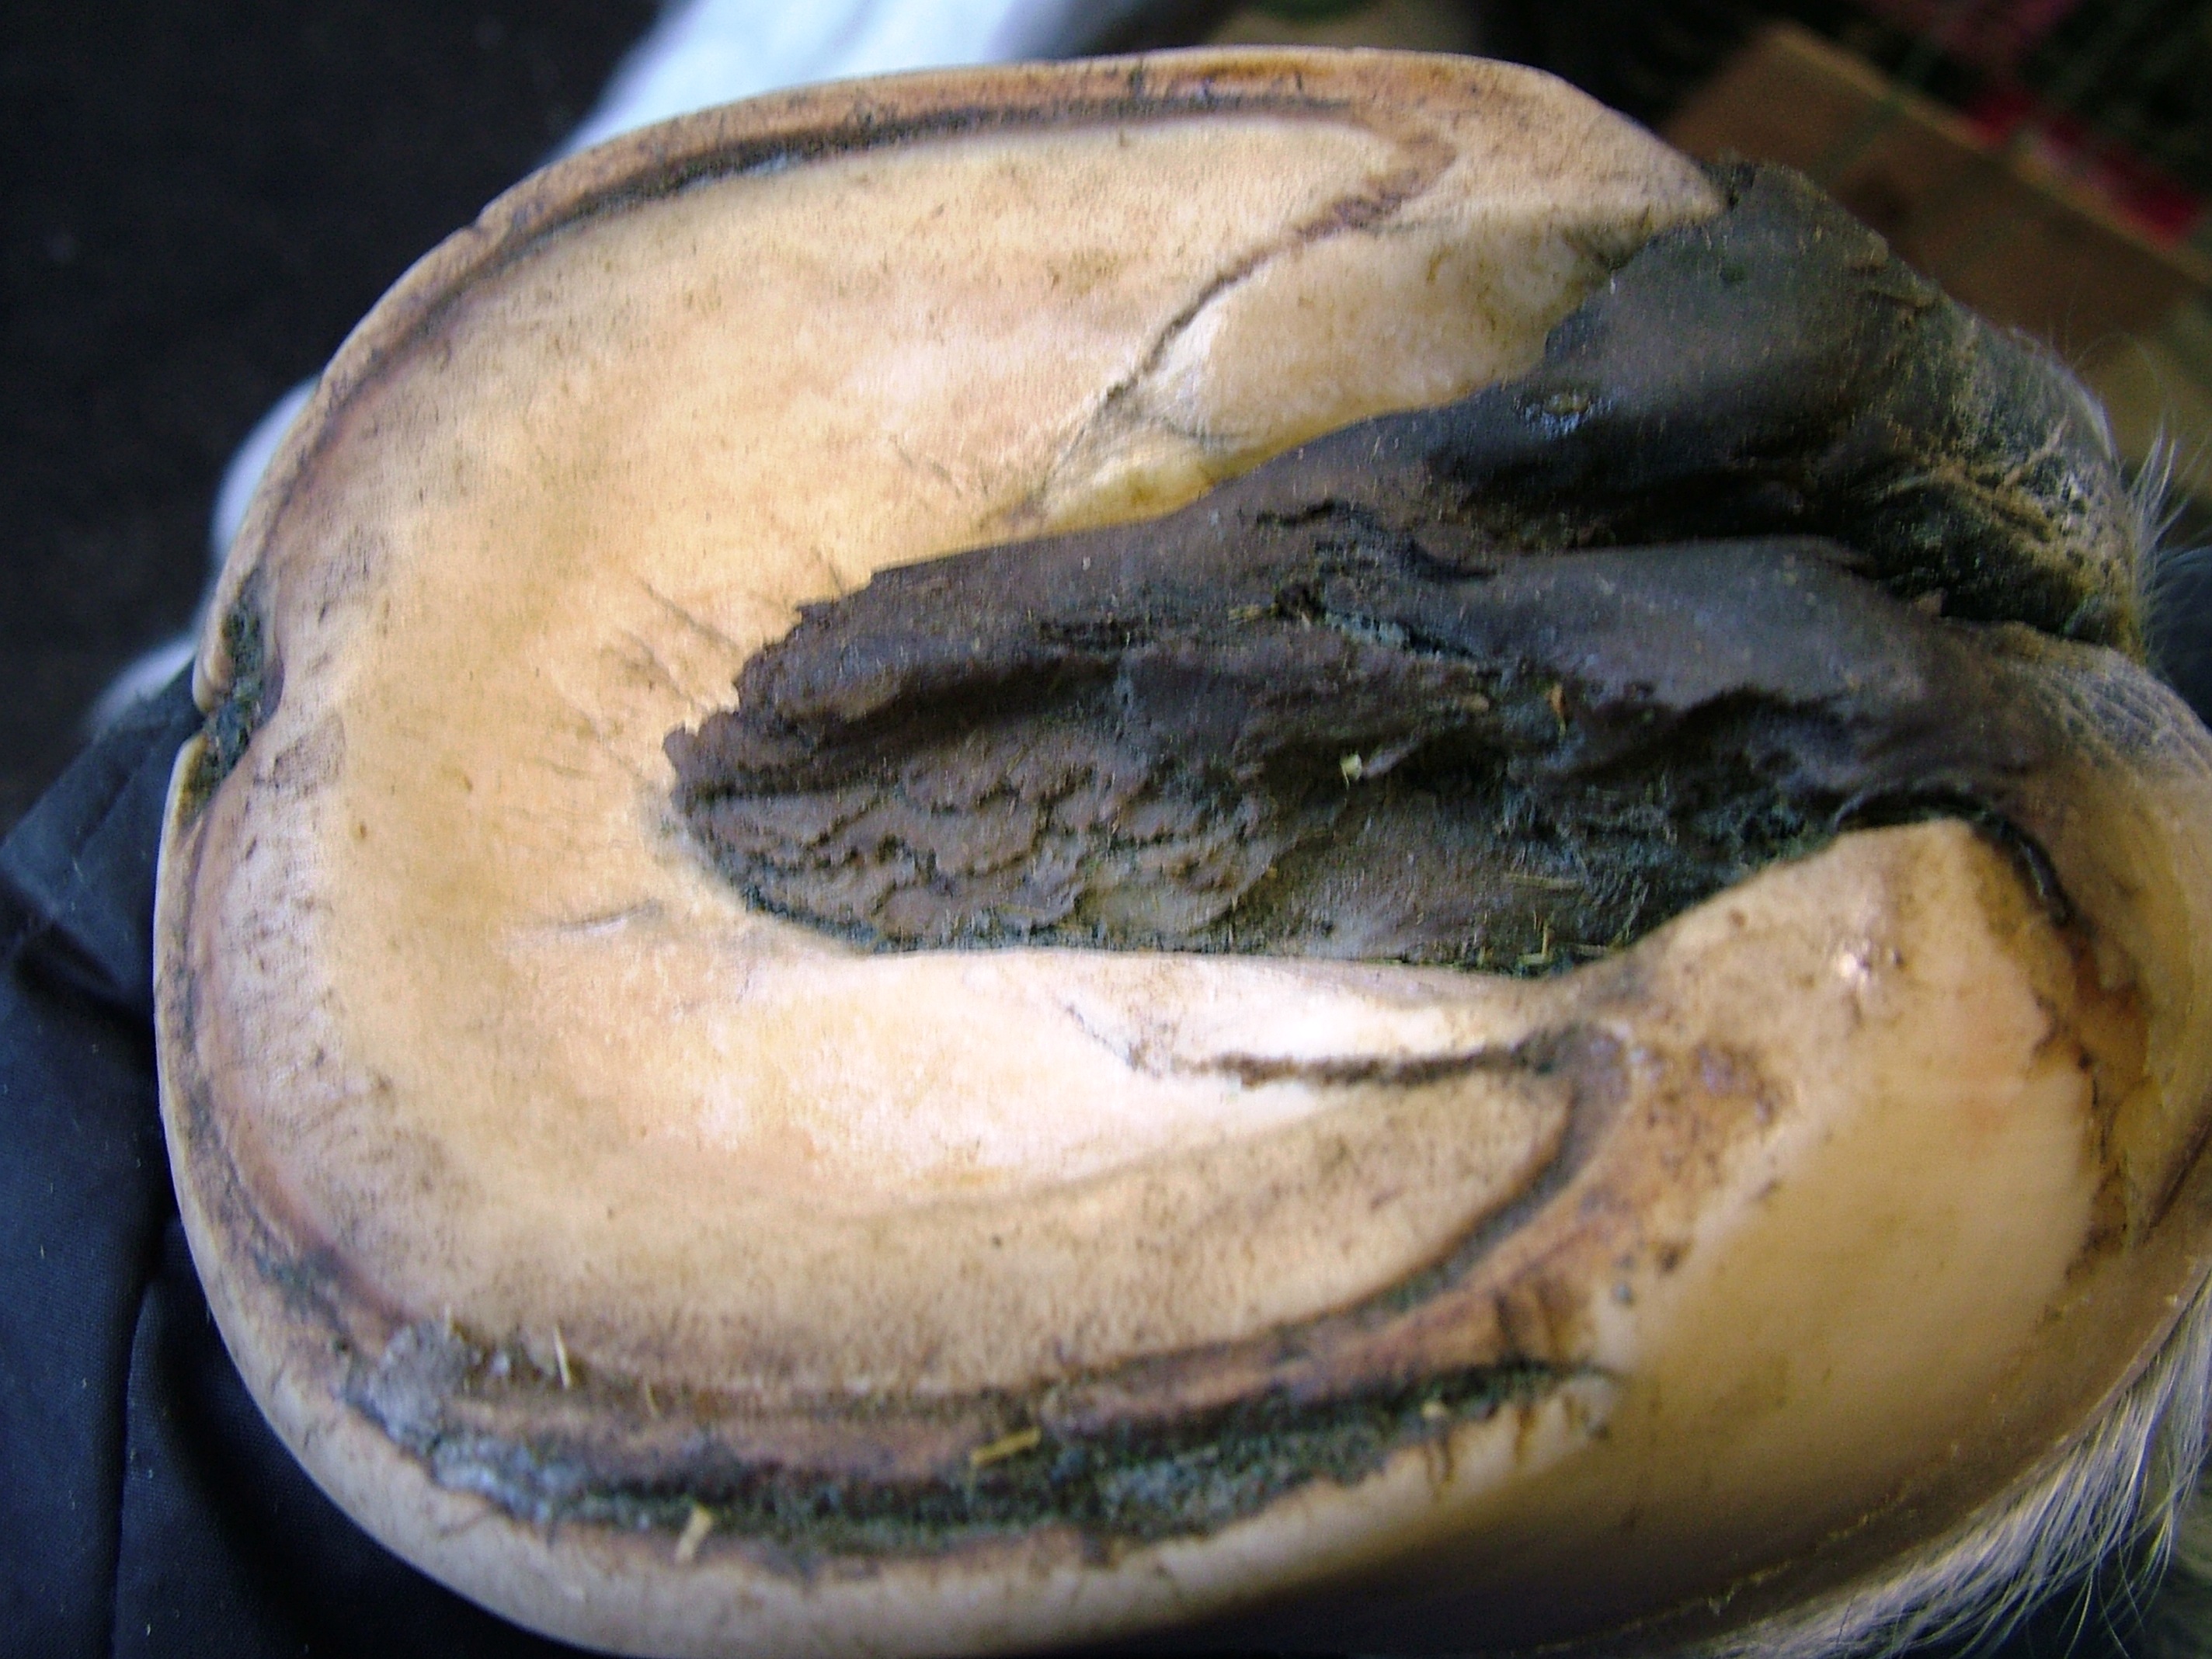
Fungal and bacterial infections in horses’ hooves are not limited to the softer frog horn. The inner hoof wall is also very susceptible to infection, and if these insults are not detected and treated in a timely manner they can lead to huge problems. In its later and very visible stages, such infection is commonly (and wrongly) called White Line Disease. Usually large areas of the inner hoof wall have been damaged by that time, and the horse is showing signs of lameness. Fig. 1 shows such a scenario.
Fig. 1
If the infection is extensive enough the suspension of the coffin bone will be at risk. When it has progressed to such a state, the disease is very difficult to eradicate with disinfecting agents, as the microbes have infiltrated deeply into solid layers of the wall and can often not even be reached with soaking until the infected areas open up and become more accessible to the treatment. Meanwhile the destruction continues and can make the beginnings of treatment appear to be quite futile.
The easiest way to eliminate any infection would be of course to cut it out entirely, but in bare hooves this can lead to disaster. When wall is weakened too much by resecting even small areas, the whole wall may lose strength and integrity and the hoof capsule may literally fall apart. It has happened to one of my horses after a respected trimmer had opened up a quarter crack that was infected. Over night, that hoof totally fell apart, it took over a year to regain a somewhat normal form, but it never returned to its original shape and the horse was sore for a long time. Practically speaking, it resembled a sinker after severe laminitis.
So the best solution for barefoot horses is to never let it get that far and to learn to recognize the beginning of the problem before it turns into a disaster.
Here are some of my accumulated observations, and I hope they can help others to avoid some of the frustrating problems I have encountered over the last 10 years.
I have no recollection of any similar problems before that, and I have been around horses for 50 years. As these types of infection seem to be so widespread now, I suspect that it may have something to do with our changing environment. This relatively new occurrence may also be the reason why so few professionals, farriers and veterinarians alike, fail to recognize the problem in a timely manner. Until 3 years ago, I was myself quite oblivious. I had no idea what I was looking at and that I could do something about it. Only when things got really bad and became apparent as big holes or a major wall excavation, would I frantically start treatment. Often, these problems resulted in at least low grade lameness and took sometimes up to a year to resolve.
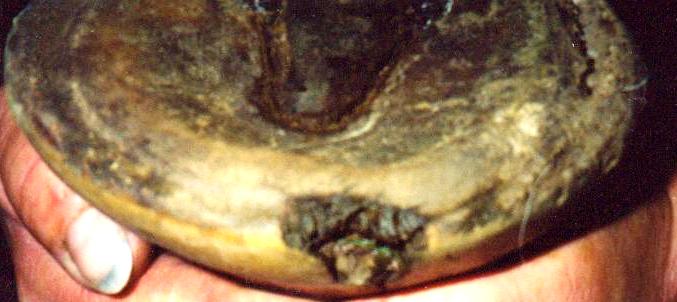
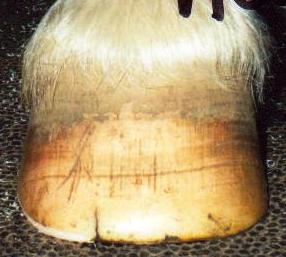
Fig. 2 shows my very first run-in with hoof wall disease. As I had no idea of what to do exactly, it got progressively worse, the horse was lame on all but very soft ground, and it took me over 1 year to resolve. Note how much the hoof capsule flared in the lower third due to the missing wall.
Fig. 2
Another strange thing is that hoof walls can be totally pristine at one trim, and at the next there are several insults. And not all horses on the same property are affected at the same time or with the same severity, and not all hooves on the same horse will be affected. Sometimes it is only one hoof, sometimes 2 or 3. Sometimes all insults can be trimmed away, sometimes they all go deeper than that. There is no pattern.
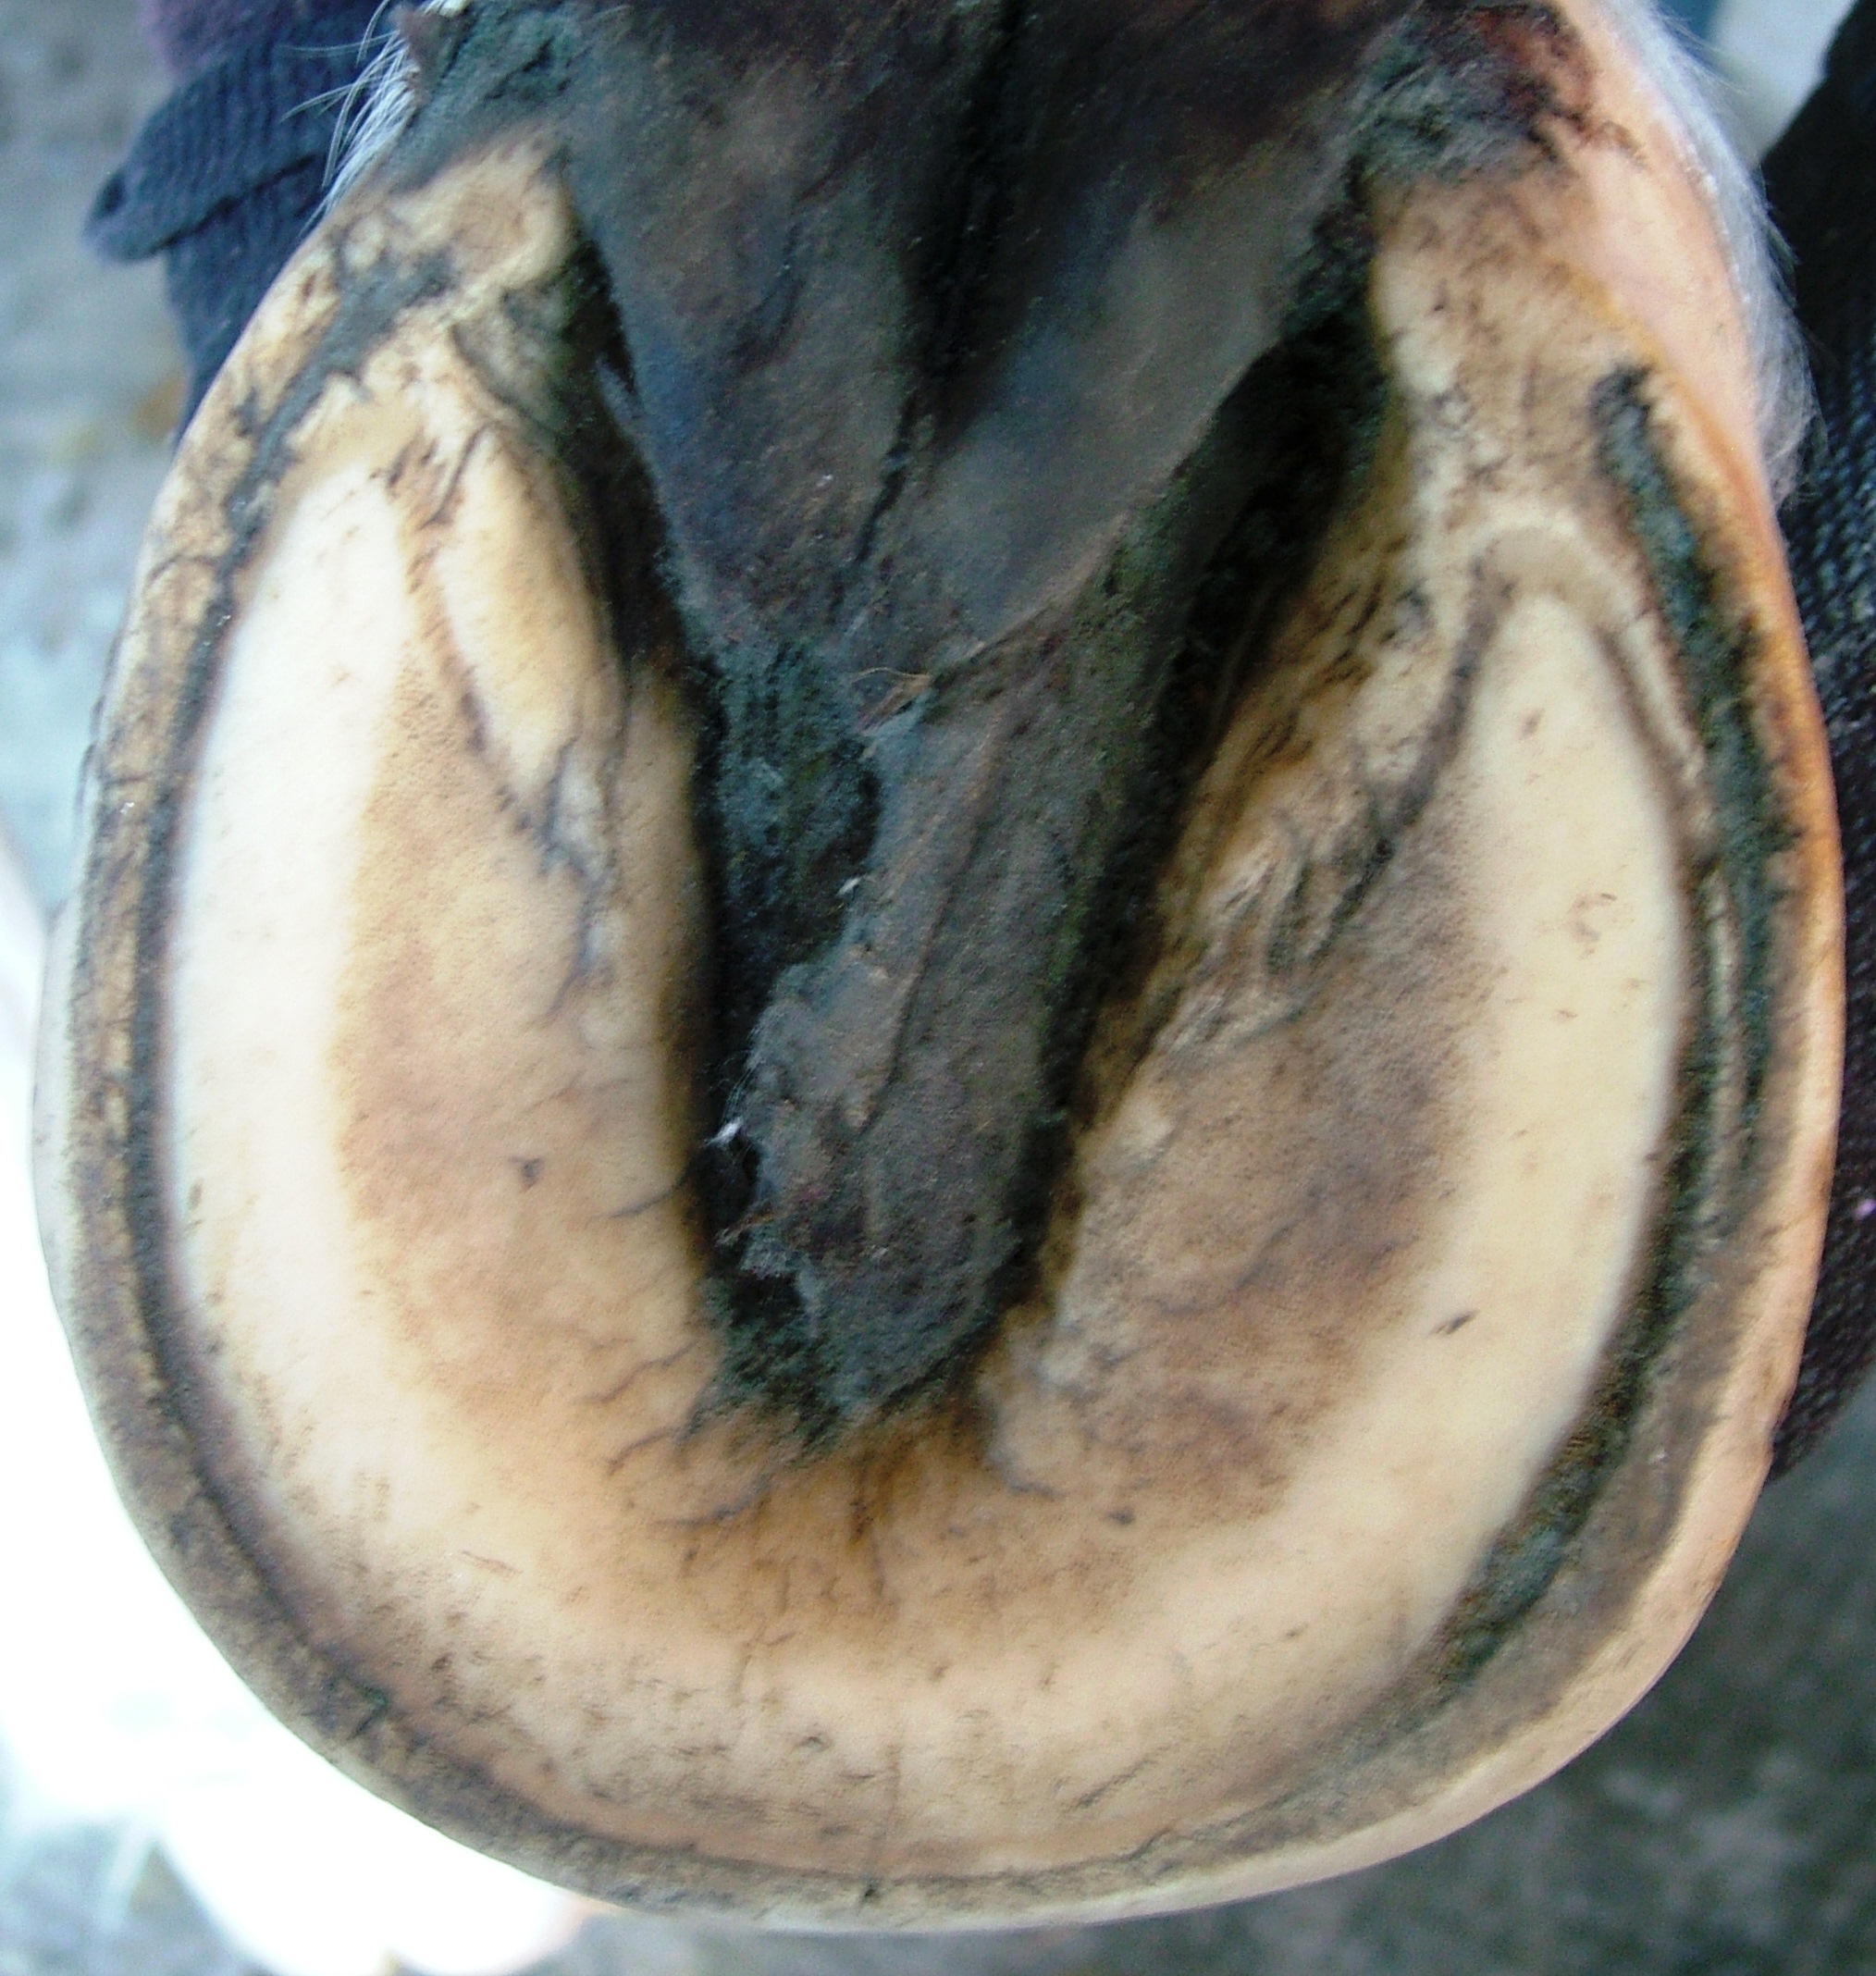
According to my observations, inner hoof wall infections seem to present in 2 major ways; as holes and as cracks of varying length and severity running either vertical or parallel to the white line.
Figure 3 shows a very typical black hole and quite a considerable crack parallel to the white line (also note the infected frog). The same picture also shows some white line deterioration on the left side. I am not sure if this is caused by the same organisms that cause the inner hoof wall destruction. I treat it anyway when I treat the other insults, but I can’t recall ever having had a severe problem with it, even when left untreated.
Fig. 3

Of course, there can be a combination of both holes and long cracks in the same area, especially if the problem has remained undiagnosed and untreated for some time.
Fig. 4 shows an example of severe infection. The toe area has 2 holes and general inner hoofwall destruction. Most of the inner wall on this hoof is affected. Note also the diseased frog. (Unfortunately the picture is not very clear). I was called in to see if I could help that horse. The veterinarian had suggested hoof wall resection and therapeutic shoeing. The horse was moderately lame. With proper treatment, the horse improved very quickly and did not require drastic measures.
Fig. 4

Black Holes
What are black holes and what causes them?
KC La Pierre is the only barefoot practitioner that I am aware of who addressed that issue some years back. Here is a link to his theory. http://www.appliedequinepodiatry.org/articles/SeedyToe.pdf
He believes that infection itself is not the primary cause, rather that a growth on the inner hoof wall, sometimes originating at the coronary band, may be the causative factor, and that these holes seem to occur always at the center of the toe. I can neither support nor refute this theory as I only have seen a relatively limited number of horses with this problem, have not done any research on cadaver hooves in this area like he did and had personally only one case where there seemed to be a white line deviation like KC describes. This I believe was caused by using Keratex Hoofputty to fill the hole, and I was able to correct the problem. This putty gets very hard in cold weather, like cement, and may very well have caused the deviation. I will discuss this later under ‘treatment’. Fig. 5 shows the deviated white line. The sole is raised into a hump around the lesion. Also note the other invasions of the hoof wall along the white line.
Fig. 5

Additionally, I see those holes in different locations as well, not just in the center of the toe. But we may both be talking about a different scenario. I can only describe my own experience, and I do encourage the reader to look up the link above. Fig. 6 shows a hole in the quarter wall. Note how the wall is bulging out due to loss of integrity. The toe has a problem as well, and note the dark crack in the other quarter wall. Both can be the start of a bad problem when left unattended. Also note again the diseased frog. Frog- and wall infections most often seem to go hand in hand.
Fig. 6
According to my personal observations, black holes usually start with a small black crack across the inner hoof wall and often across the white line as well. They are mostly located in the toe area, probably because this area receives the most stress from the ground and allows for micro cracks that these anaerobic organisms need to get started and survive. I think this is also the reason why they don’t attack the much softer and less dense white line to begin with, too much air can get to that horn. Of course, eventually the white line is often invaded as well as the sole, but it is not the primary seat of this disease.
It is often very difficult to do anything about those cracks as they are so tight that one cannot clean them out, and sometimes they go already so deep up into the wall that one would have to cut a considerable hole which may make the problem worse. Also, many of those cracks do not develop into holes, so I just keep a close watch on them.
Fig. 7 shows what could be the beginnings of black holes. This is before the trim and not much of a problem is visible. Note the longish invasion along the wall in the quarter, and the shorter cracks across the wall in the toe area.
Fig. 7
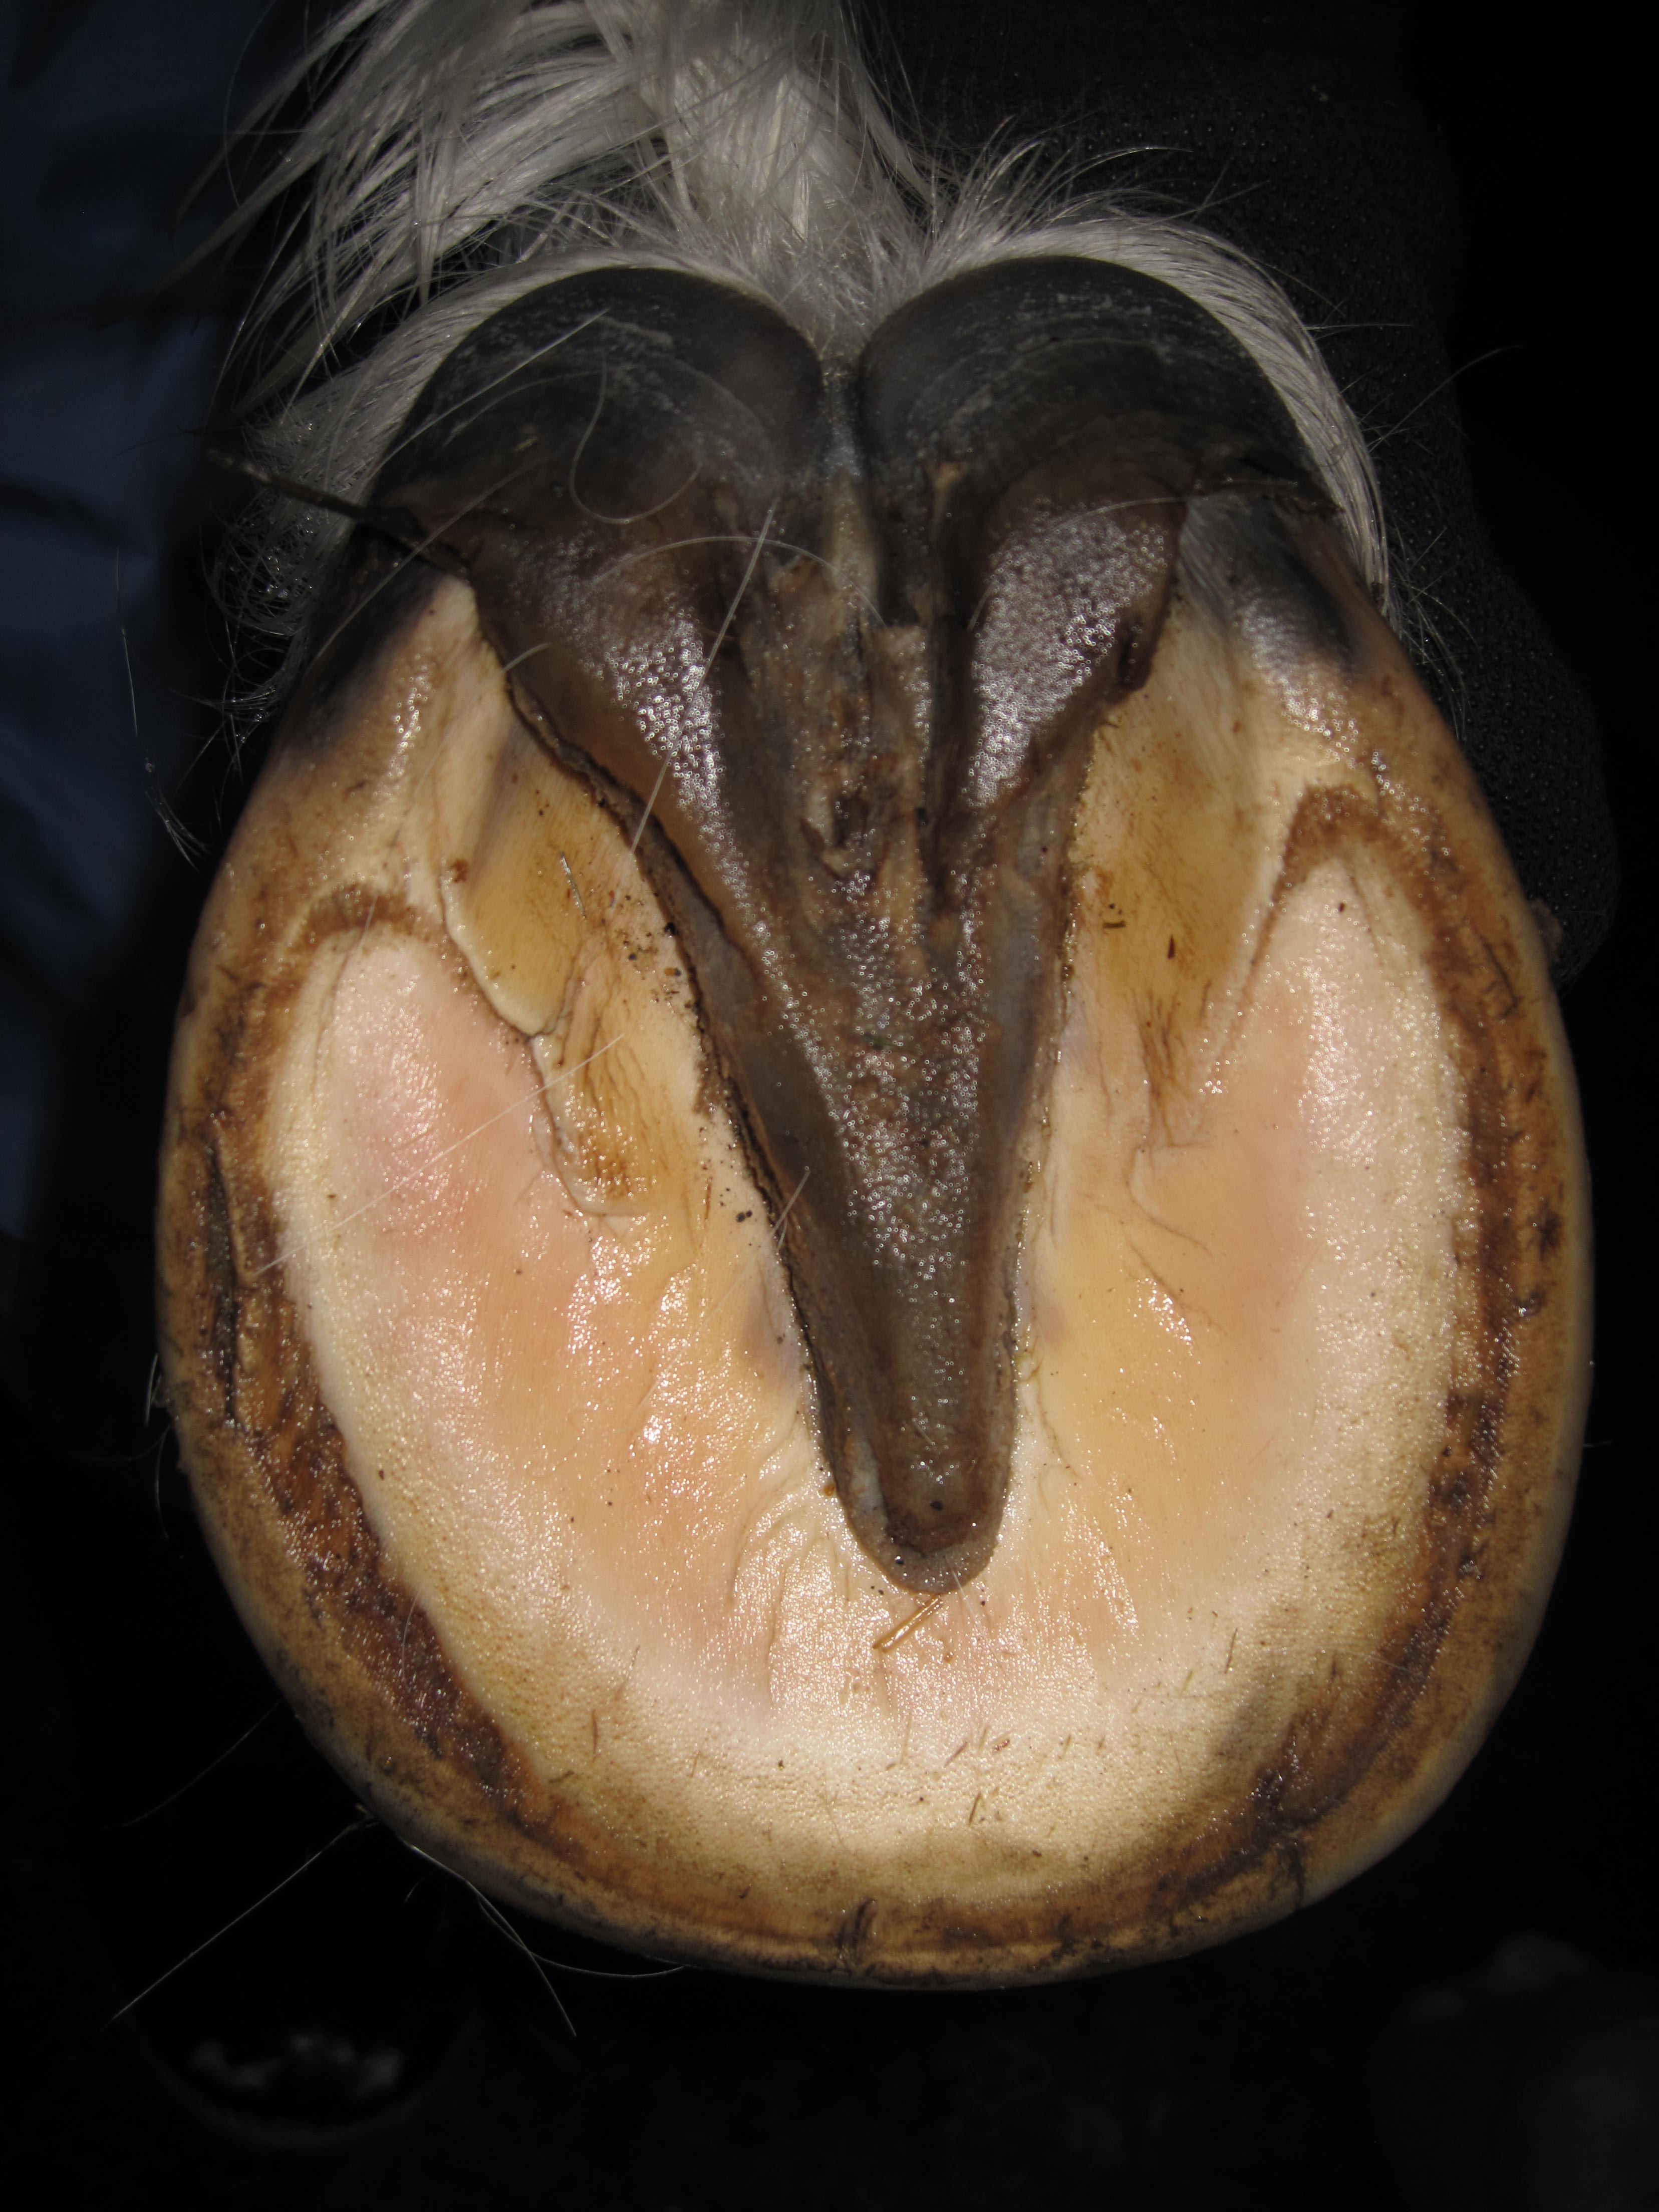
Fig. 7a shows the same foot after the trim. The quarter insult trimmed out, and the toe cracks do not look that bad. But note how that one crack goes right through the white line into the sole. Definitely a must for investigation. Also note that the crack already split the outer wall.
Fig. 7a
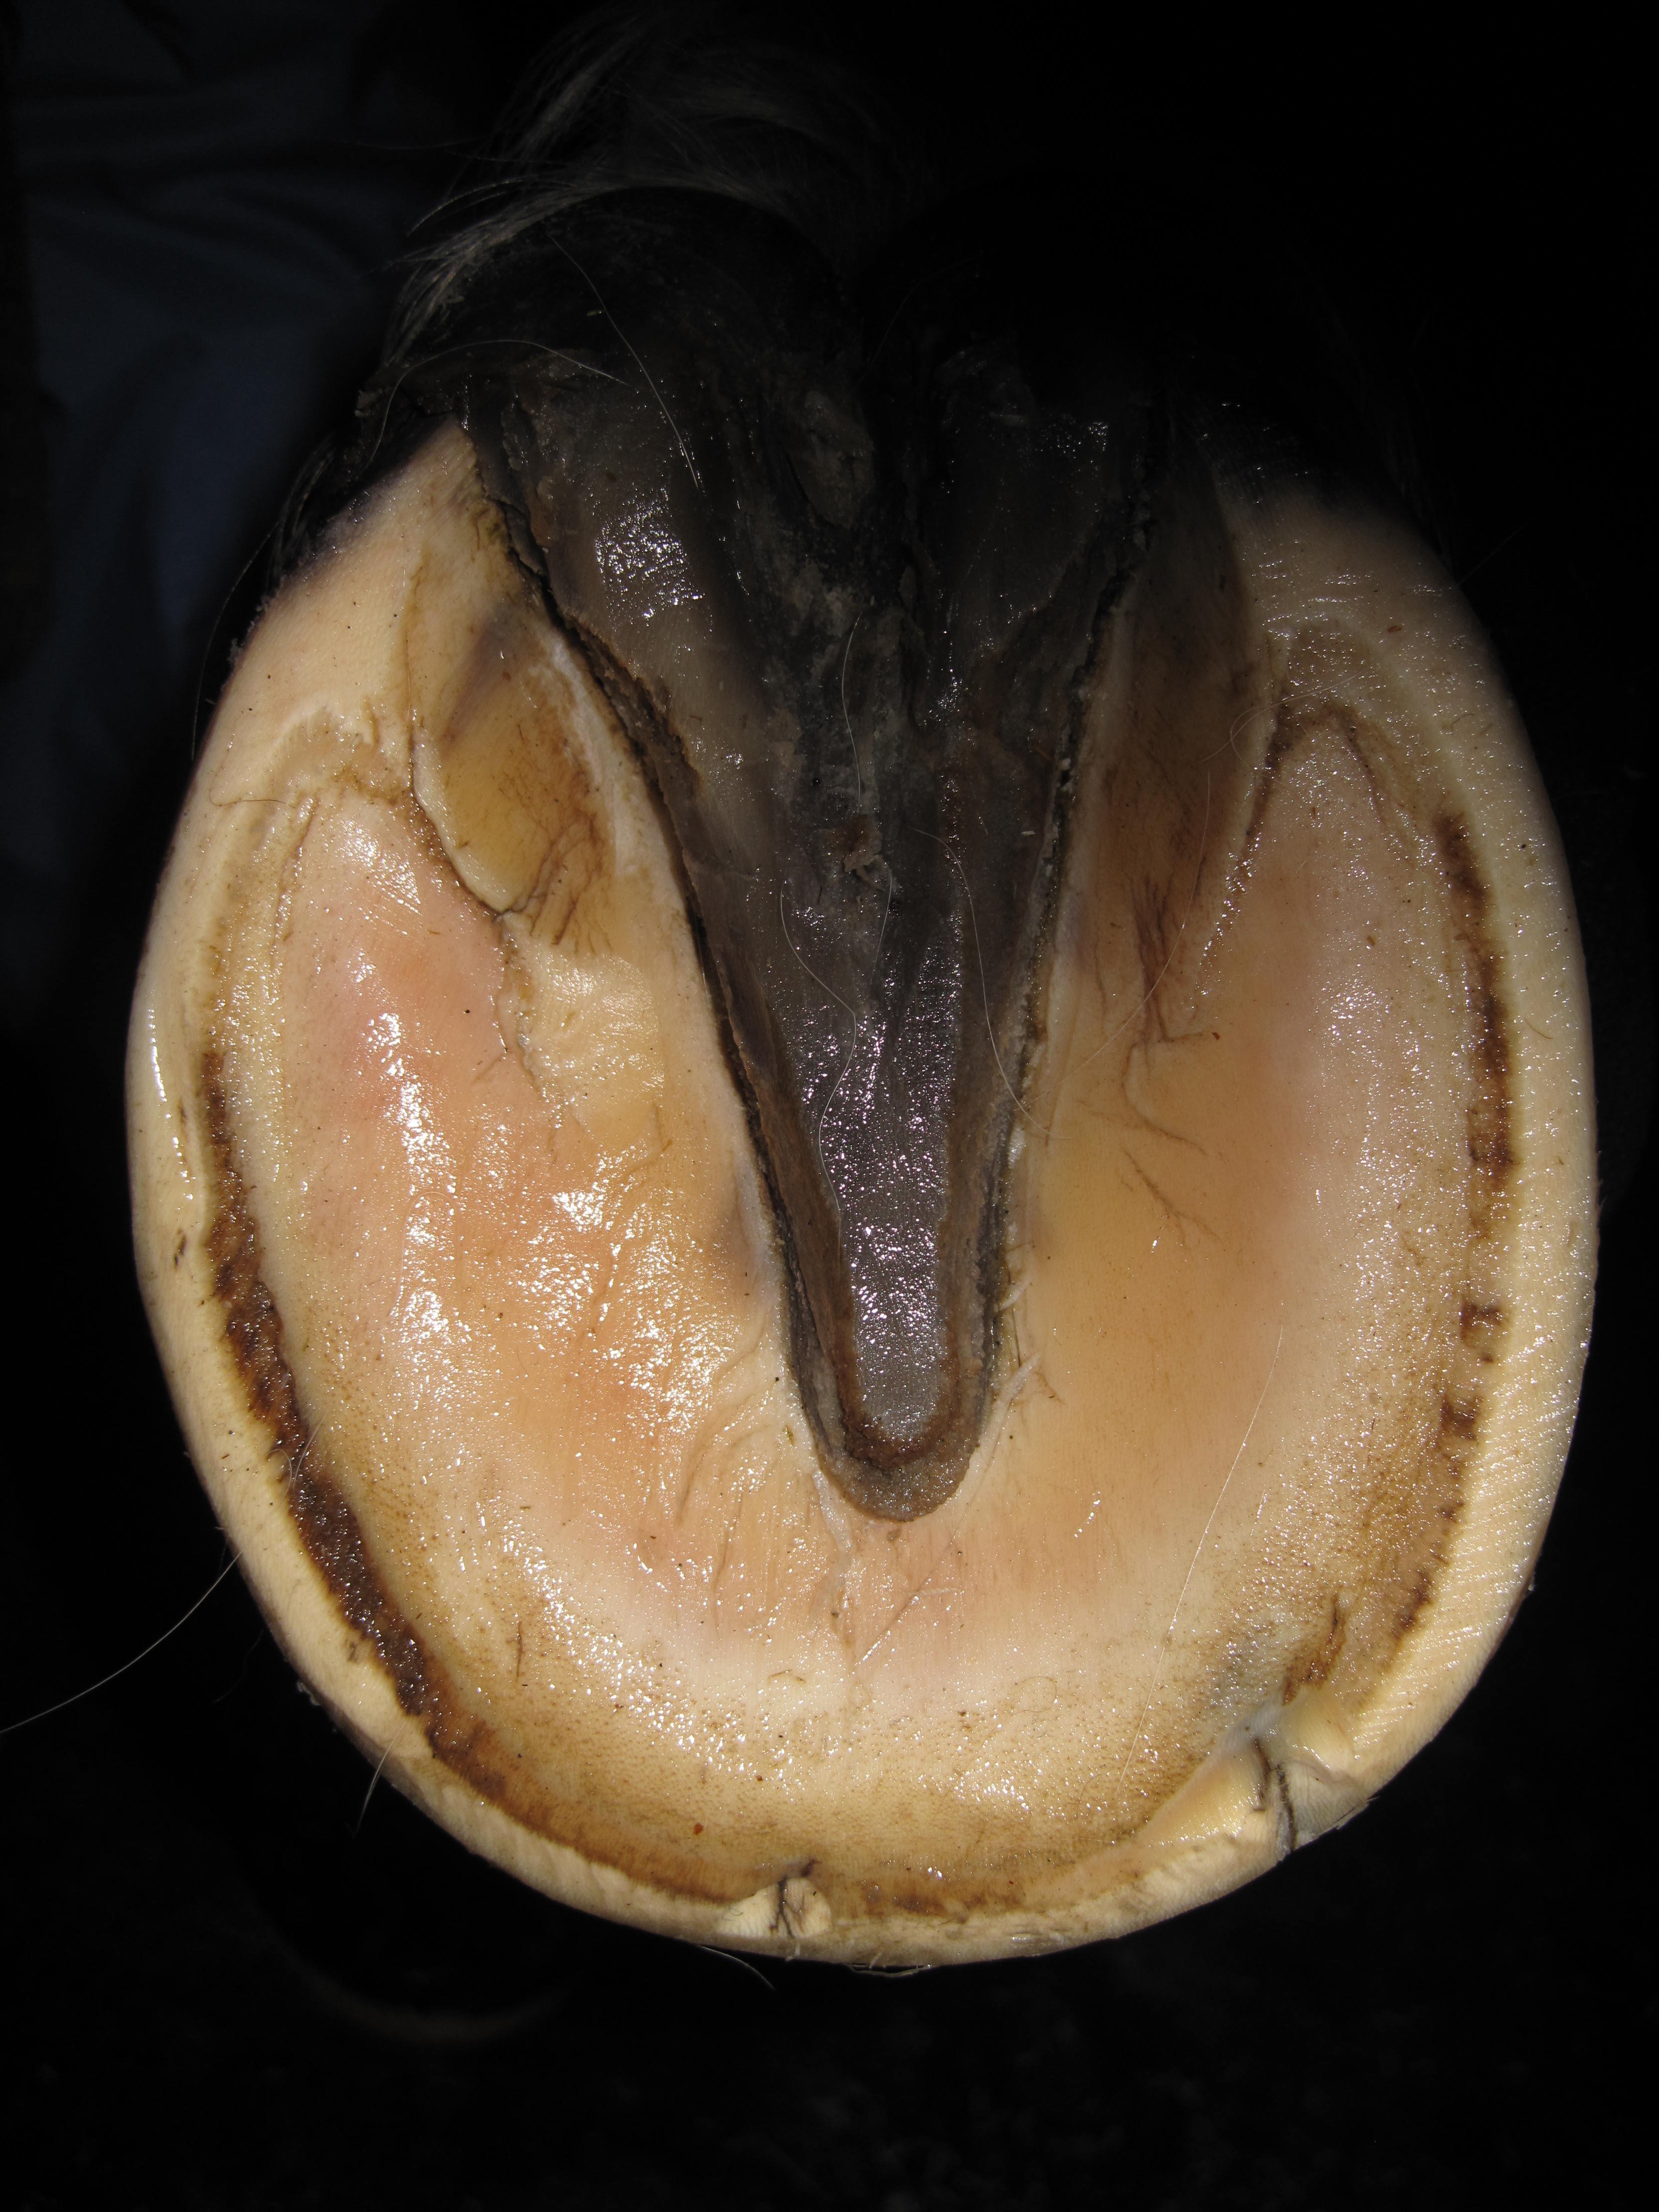
Fig. 7b shows investigating the depth of the crack with a dental probe. (I broke off the thin and sharp tip. What is left is a great tool for probing cracks.) I guess looks were very deceiving.
Fig. 7b
Fig. 7c shows how deep the dental probe penetrated. You can see it by the debris that is left on the tool. The other crack did turn out to be benign.
Fig. 7c
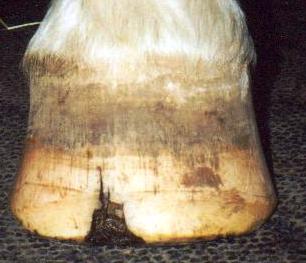
In spite of all my experience with this problem (sigh!!) and all my diligent scrutinizing, sometimes I do not notice a crack in the inner wall or even a hole until I see a crack on the outside of the hoofwall. What happened in that case is that the disease ate its way instantly deeper into the wall without a very noticeable crack visible from below. As my horses wear their toes mostly on their own, I don’t often trim there and so overlook the crack. These cracks are often not visible at all until one trims into new horn. The crack on the outside of the wall develops because the inner wall has been weakened or destroyed and the outer wall can no longer keep its own integrity.
Fig. 8 shows the tell-tale crack on the outside. Many people think those are stress cracks due to long toes or other imbalances, but in my experience these cracks are always caused by infection, at least in well cared for hooves. This may of course be different if the hoof were very overgrown.
Fig. 8
With most cases, the crack on the outer wall is usually not as high as the extent of the disease in the inner wall. So when one sees a crack that is ½” long, the disease is most likely already ¾ to 1” up the wall.
These cracks vertical to the while line can occur anywhere in the hoof wall. Fig. 9 shows one of those cracks in the heel area. Note also the beginning of insults in the inner wall parallel to the white line. And of course, there is frog disease as well.
Fig. 9
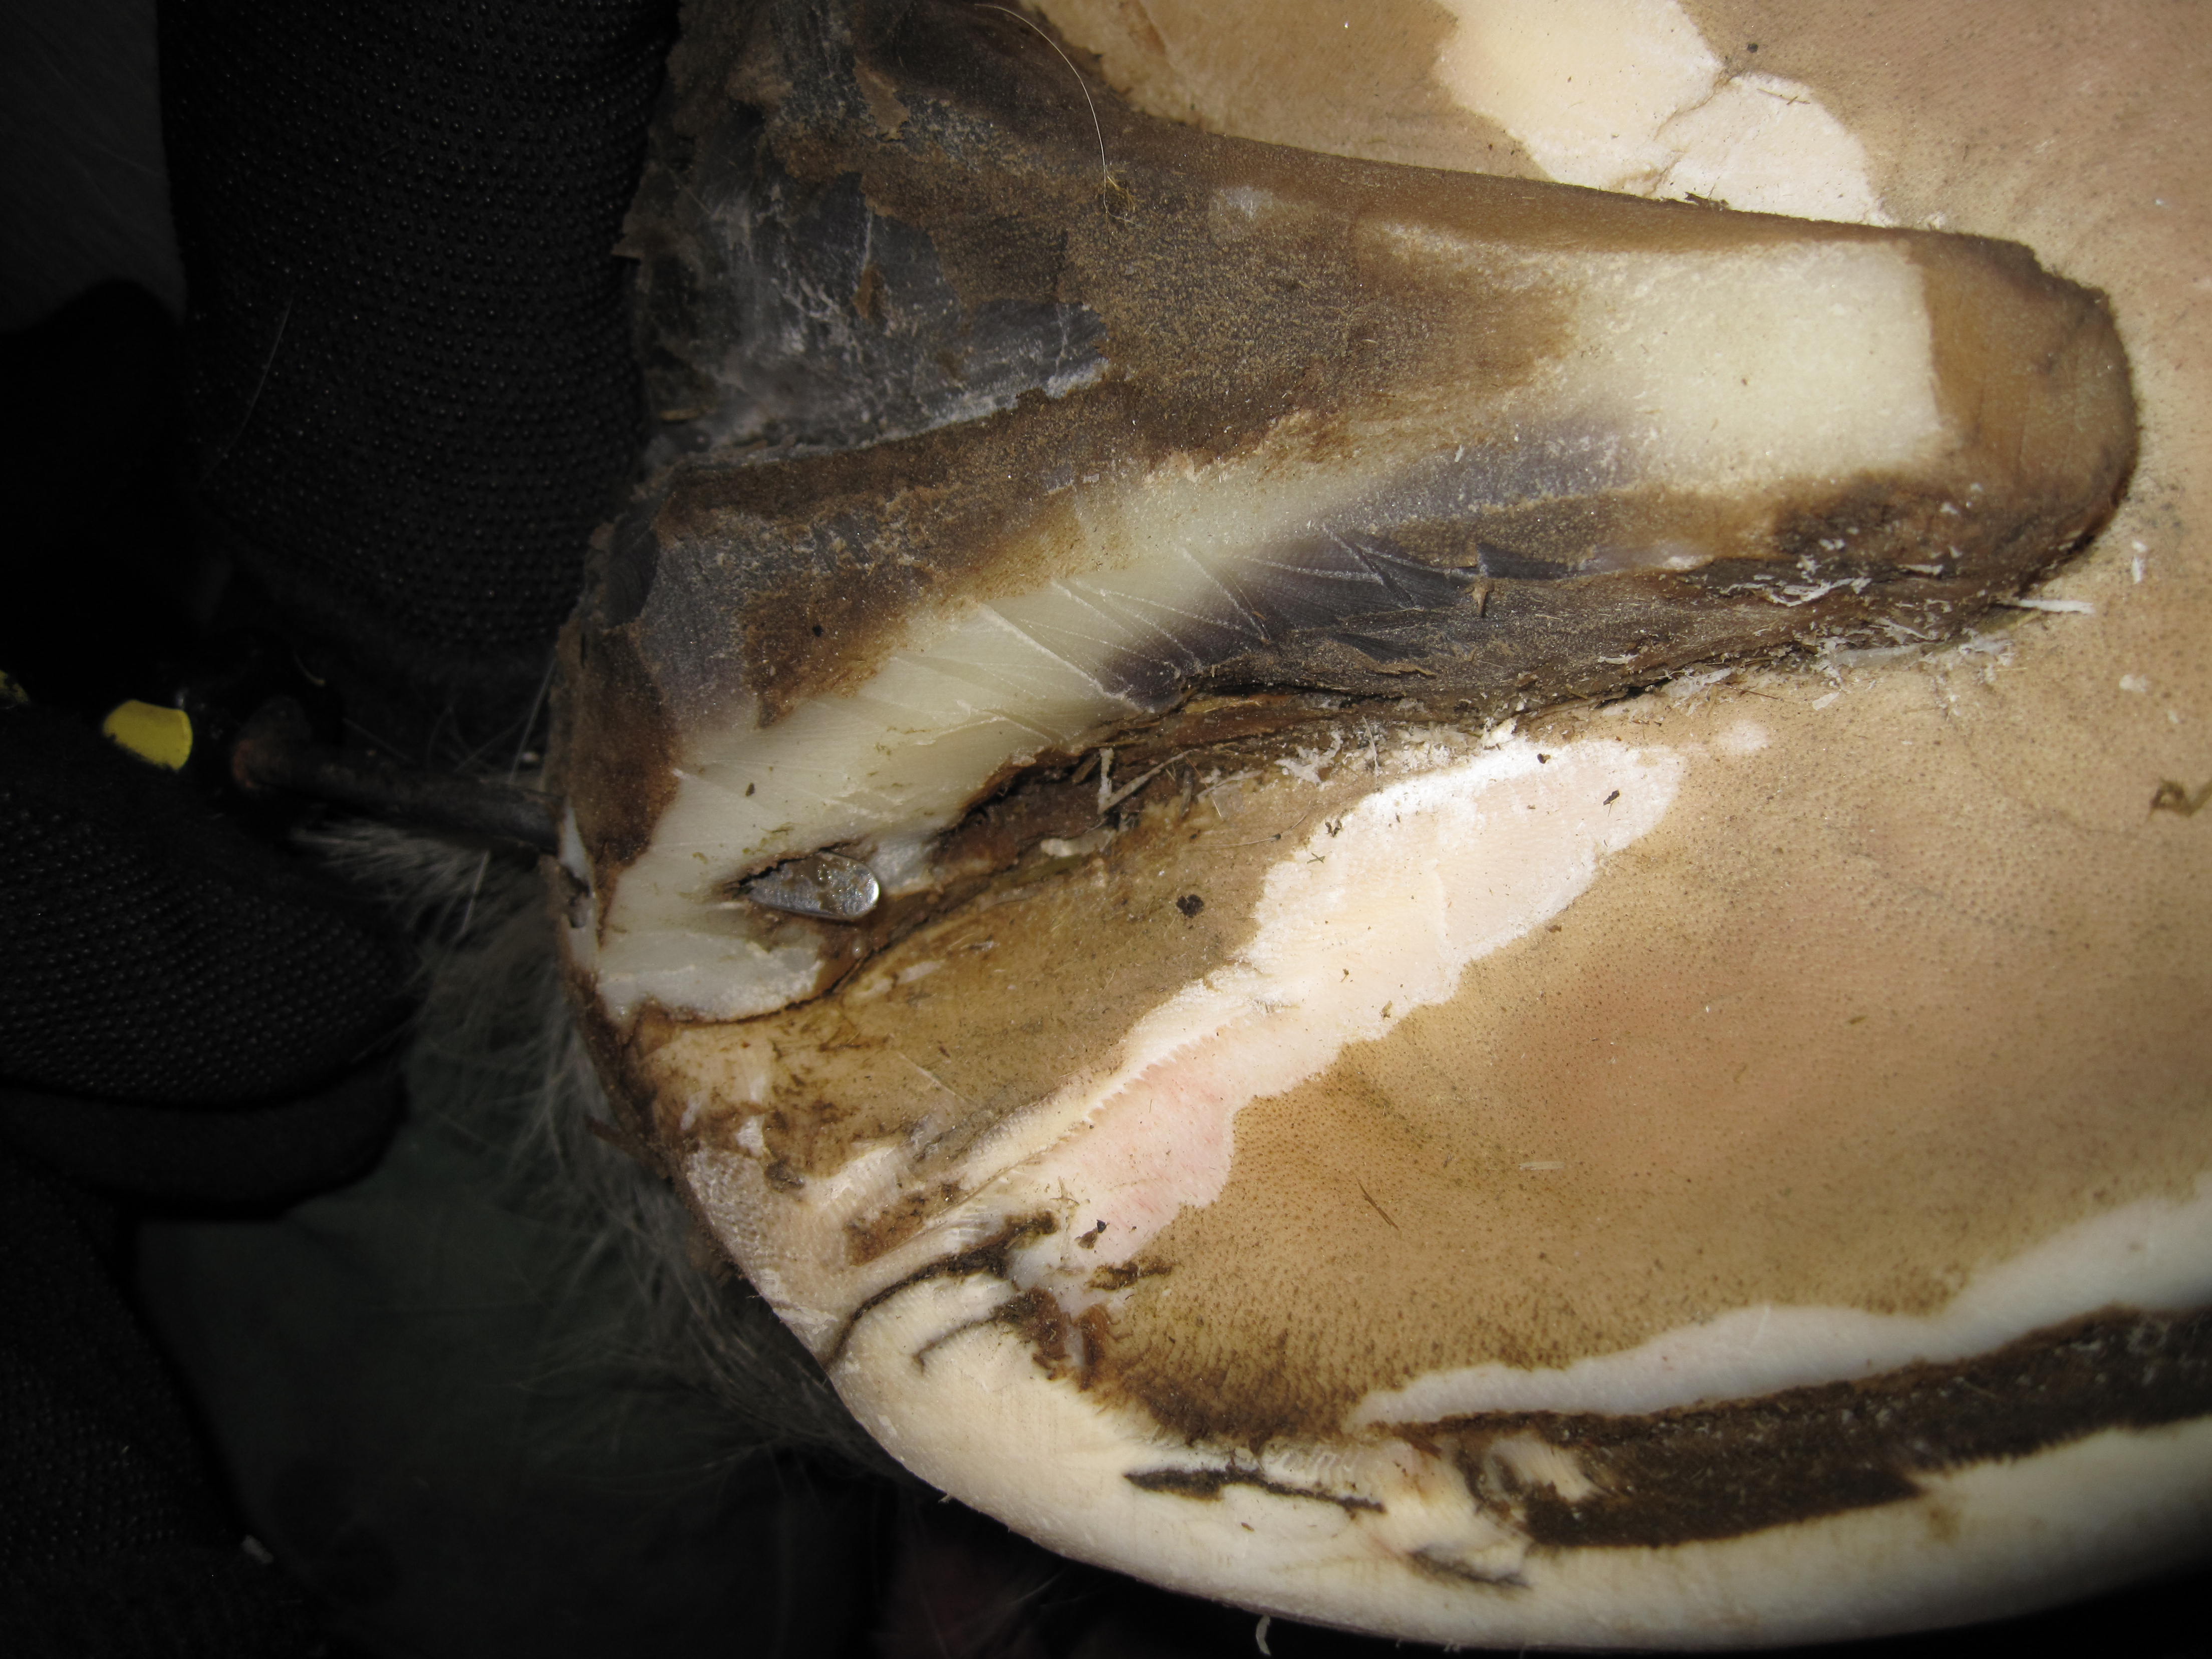
Fig. 10 shows a very typical presentation of multiple invasions in the toe area. All or none of those may develop into holes, but from experience I would definitely recommend cleaning them out as thoroughly as possible and treating with some agent. Cracks like these I see most often in horses who work a lot and have lots of toe abrasion. This of course totally refutes the theory that lots of movement helps prevent hoof wall disease.
Sometimes, holes also develop in the sole area, right behind the white line. They are usually much harder to find as one seldom trims in this area and sole pushes over the insult, totally hiding it from view. I had such a case, but unfortunately did not have a camera handy. There was just the slightest indication of a little darker area, and the adjacent white line looked a bit strange.
I almost put the hoof back down but decided to at least take one swipe with the knife. This revealed a small hole and so I took my rounded screwdriver to palpate the horn and WOW down into the sole it went at least ½” and I just could control my motion enough that it did not slip into live tissue. Then I carefully excavated the hole, and really smelly black stuff came out. Fig. 11 shows that same hole after 2 weeks of treatment, here after cleaning it out and ready for new treatment. Note also the insult in the white line on the right of the hole that appears like a hole, but it is not very deep.
Fig. 11

.
Hoofwall Decay Parallel to the White Line
Cracks that run parallel to the white line can turn very quickly into a major infection as seen in Fig. 1. This type can spread seemingly overnight, both in length and depth. Also, the disease often does not limit itself to the black and visible crack, it infiltrates the adjacent horn and turns it into a saw dust like substance. When cleaning out such an area, often a considerable crevice is revealed. And most likely one has not reached the true bottom of the insult either, only to the depth were all the horn was already destroyed and came out easily.
The other problem is that dirt and debris work their way into the wall, wedging the wall away from the white line or even deviating the white line. Fig.12 shows such a case of a deviated white line. Note also the beginning of an insult in the heel area on the right.
Fig. 12

Fig. 13 shows a case where the hoof wall is wedged away from the white line. This was a very deep insult and took months to resolve.
Fig. 13
Not only can this disease destroy healthy wall, it also can lead to abscessing. X-rays are a helpful tool to expose the extent of present hoof wall disease. The radiograph in Fig. 14 is from a horse with a history of unexplained periodic abscessing. I guess this picture explains a lot. I never saw the foot in person, so I can’t say if those insults would have been visible from the outside. I would very much assume so.
Fig. 14
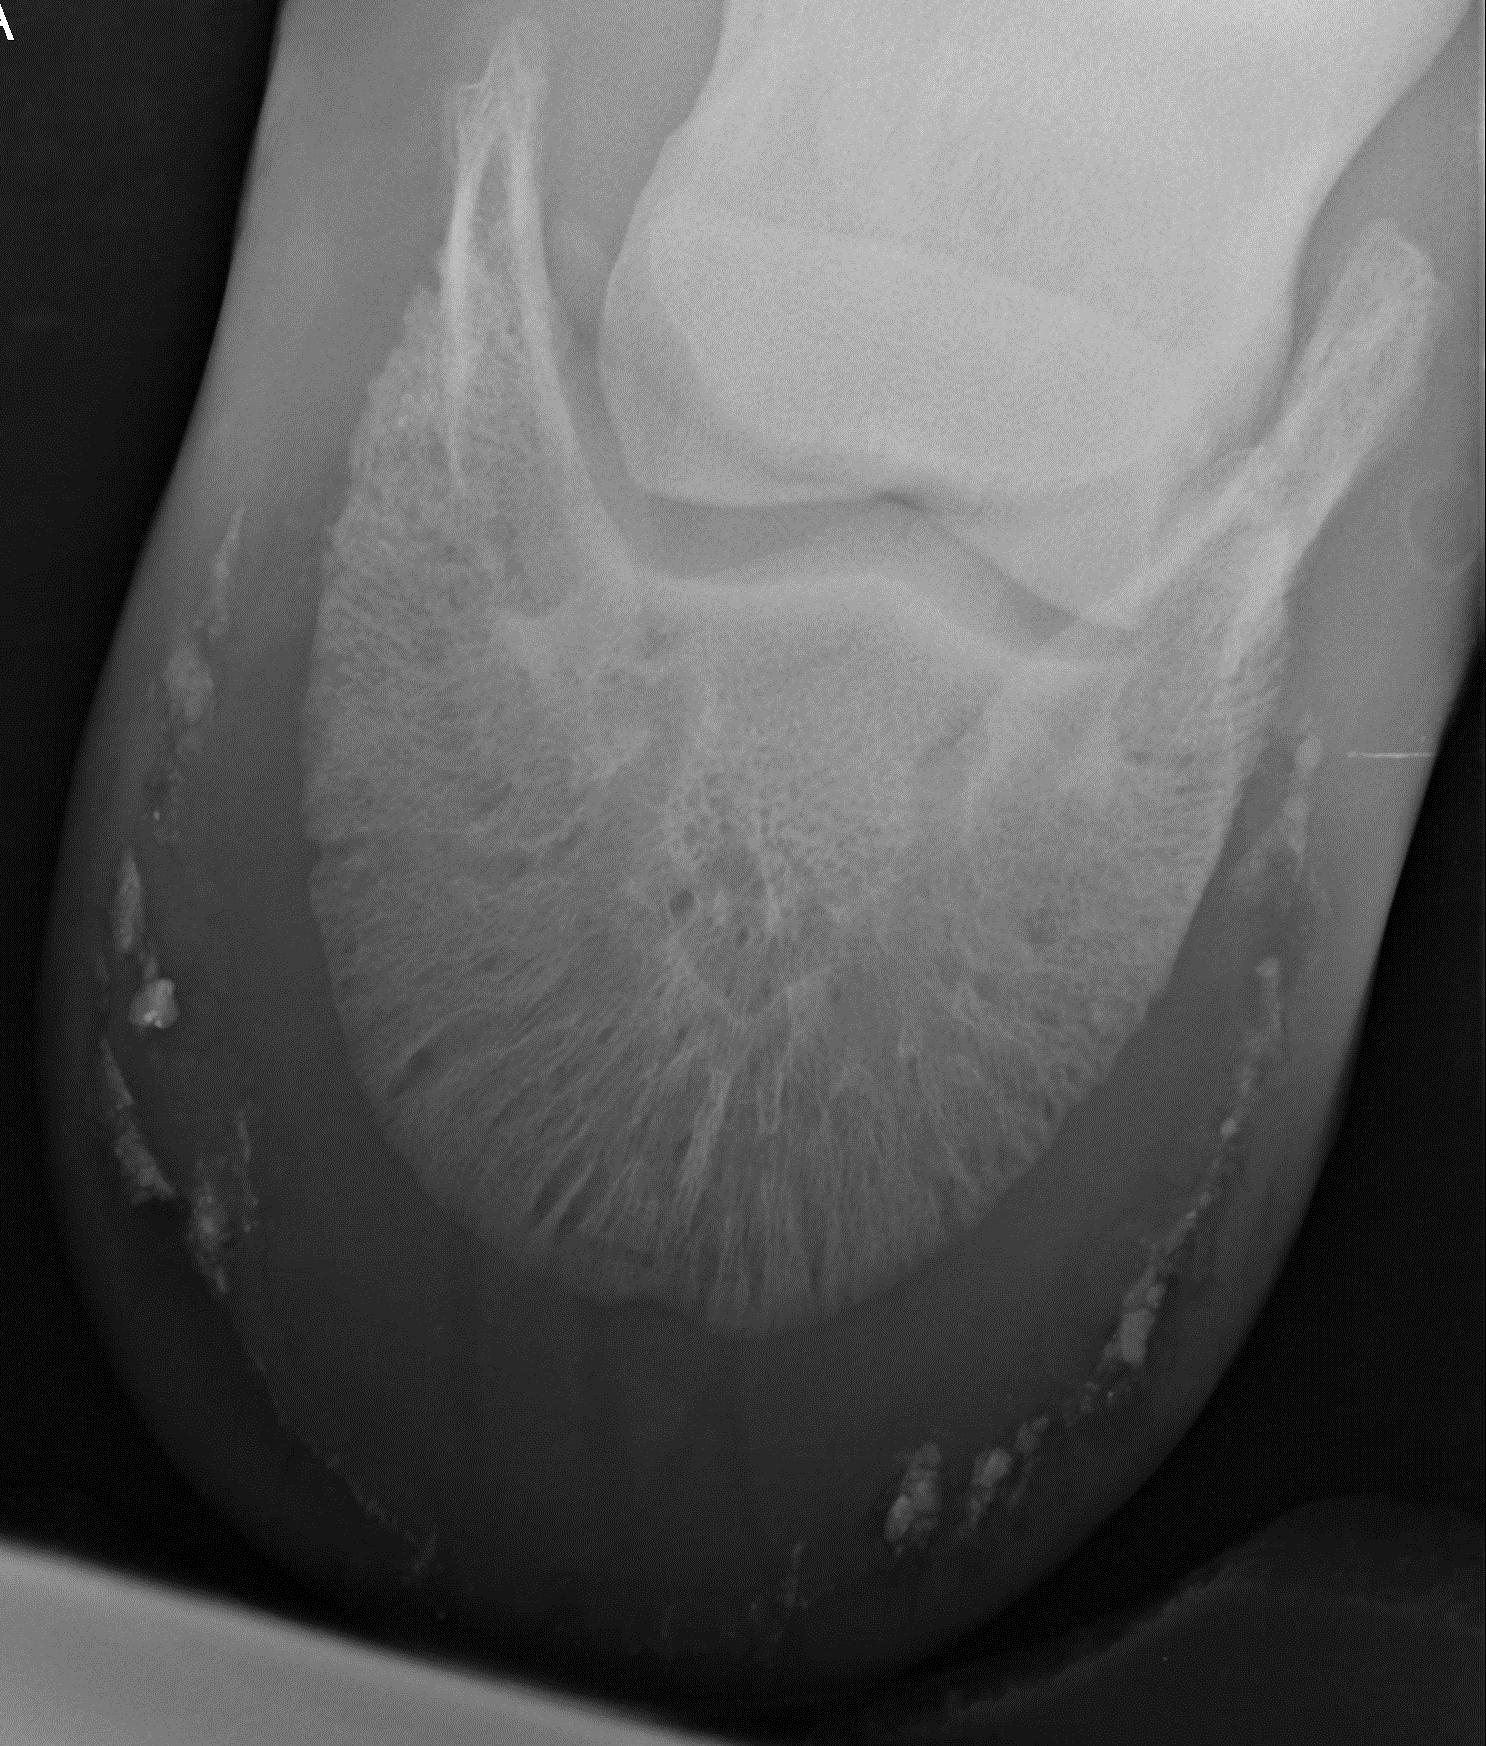
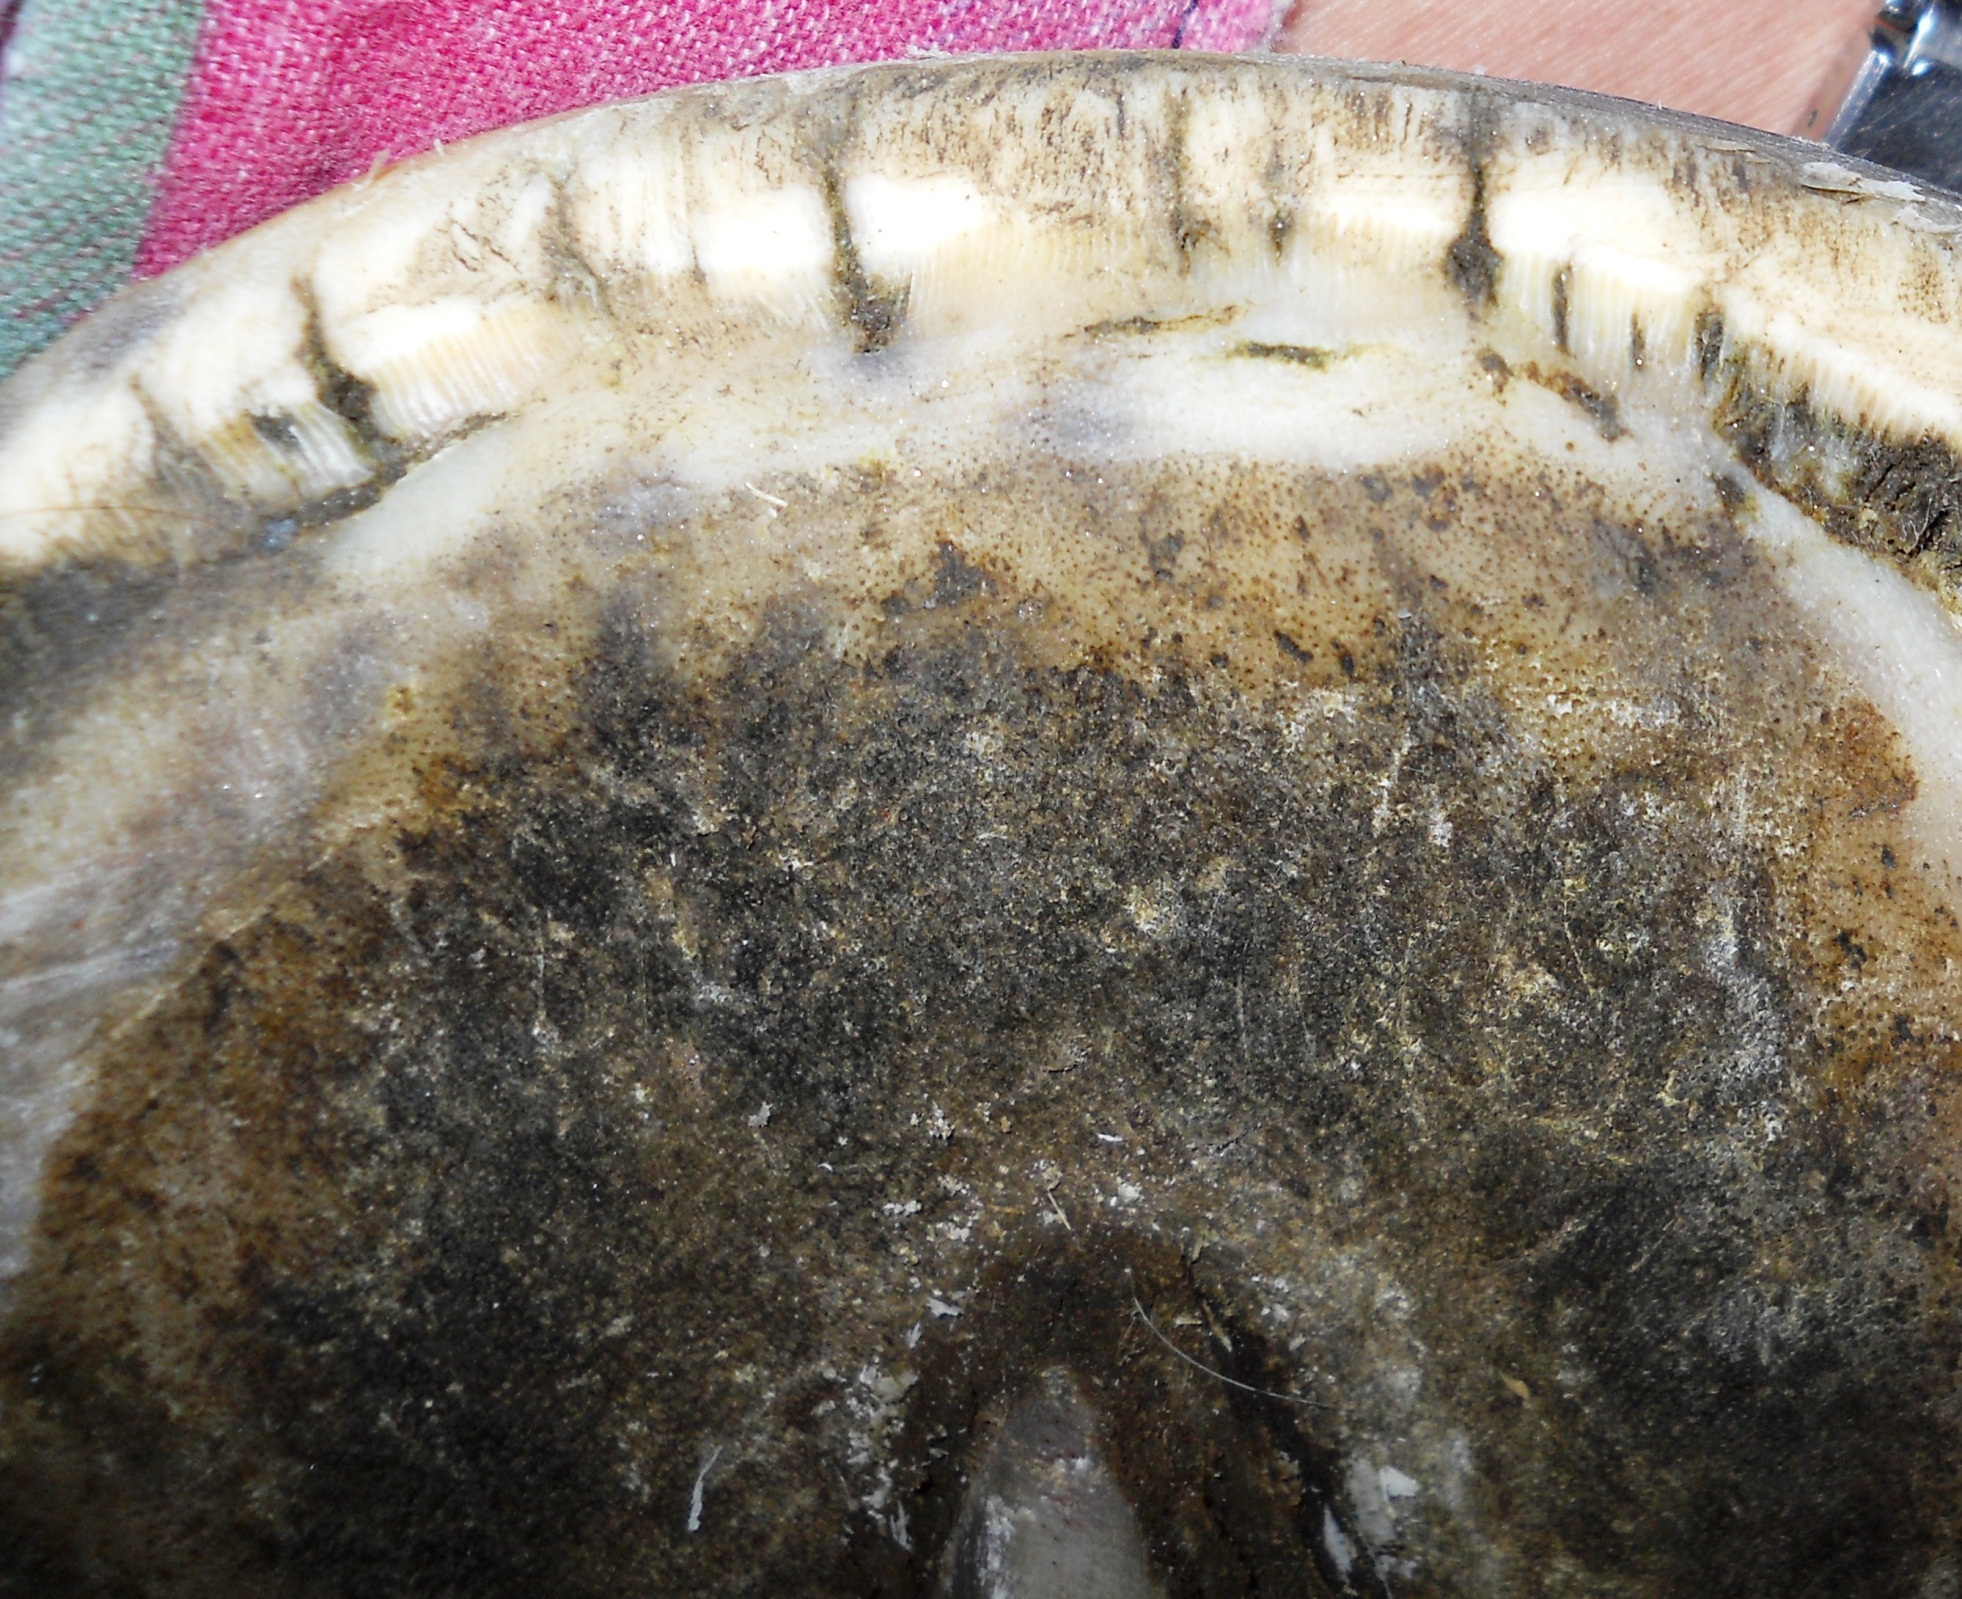
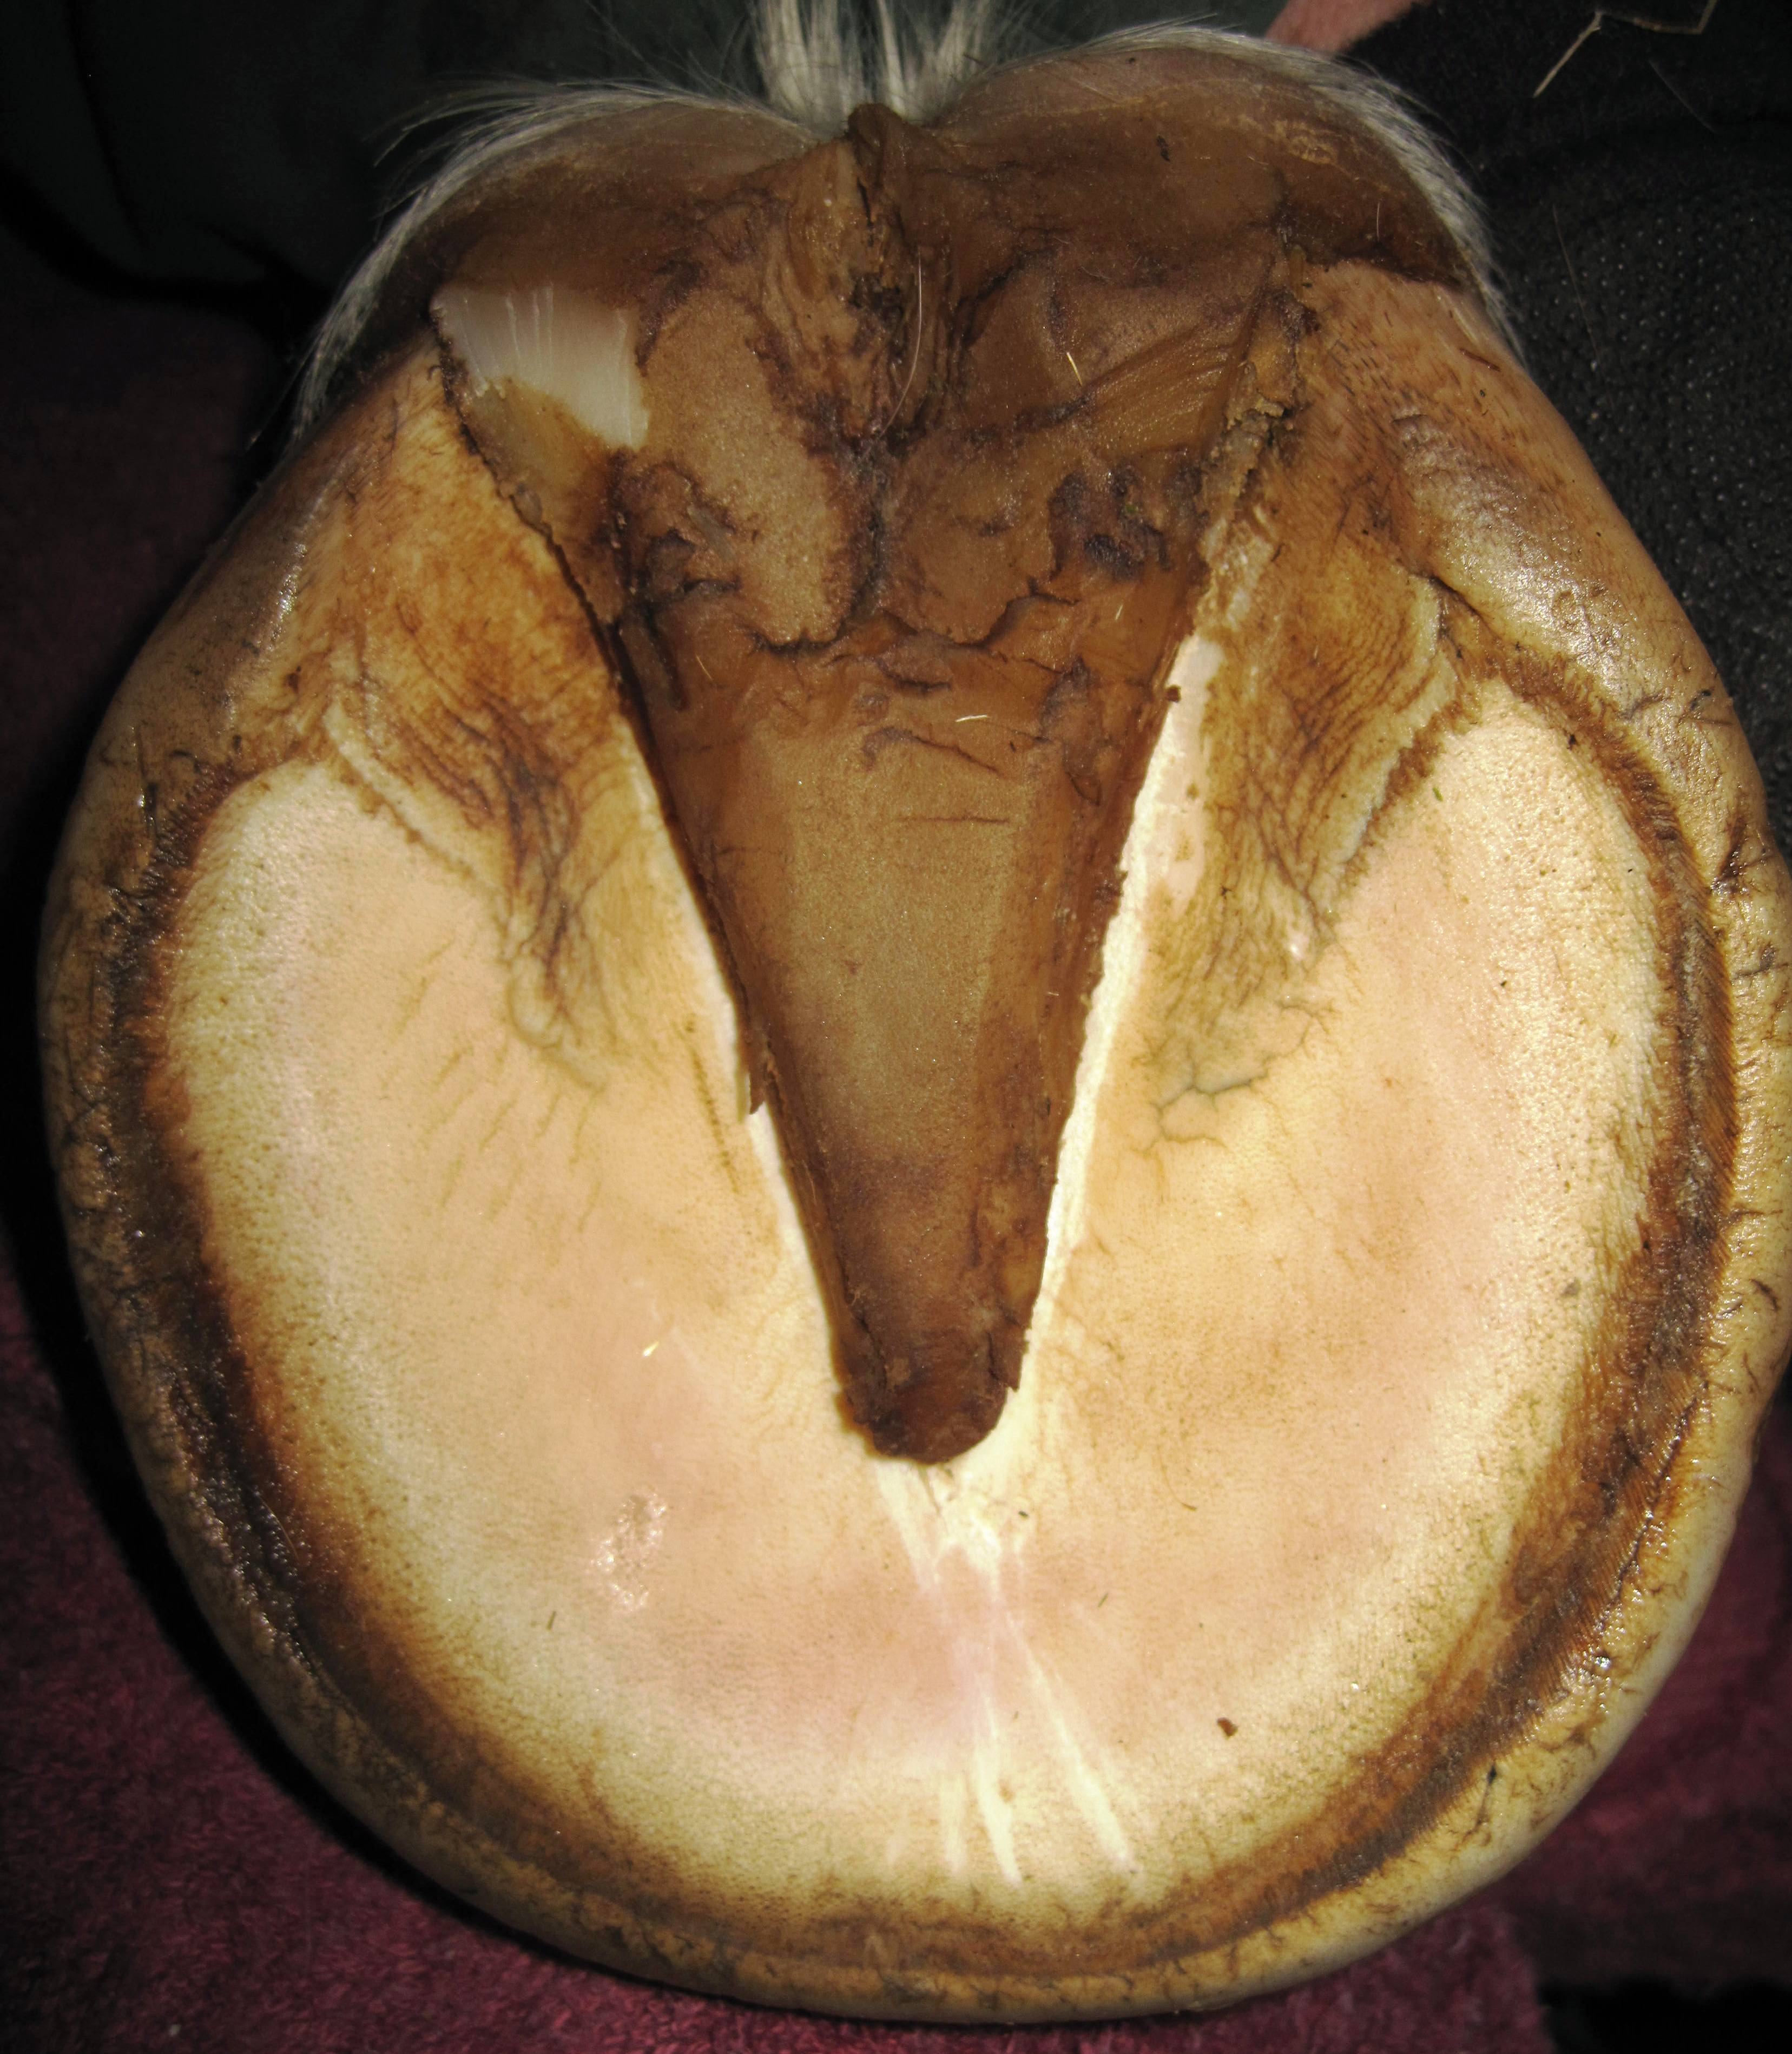
Fig.15 and Fig.16 show typical presentation of insults to the inner wall.
Fig. 15
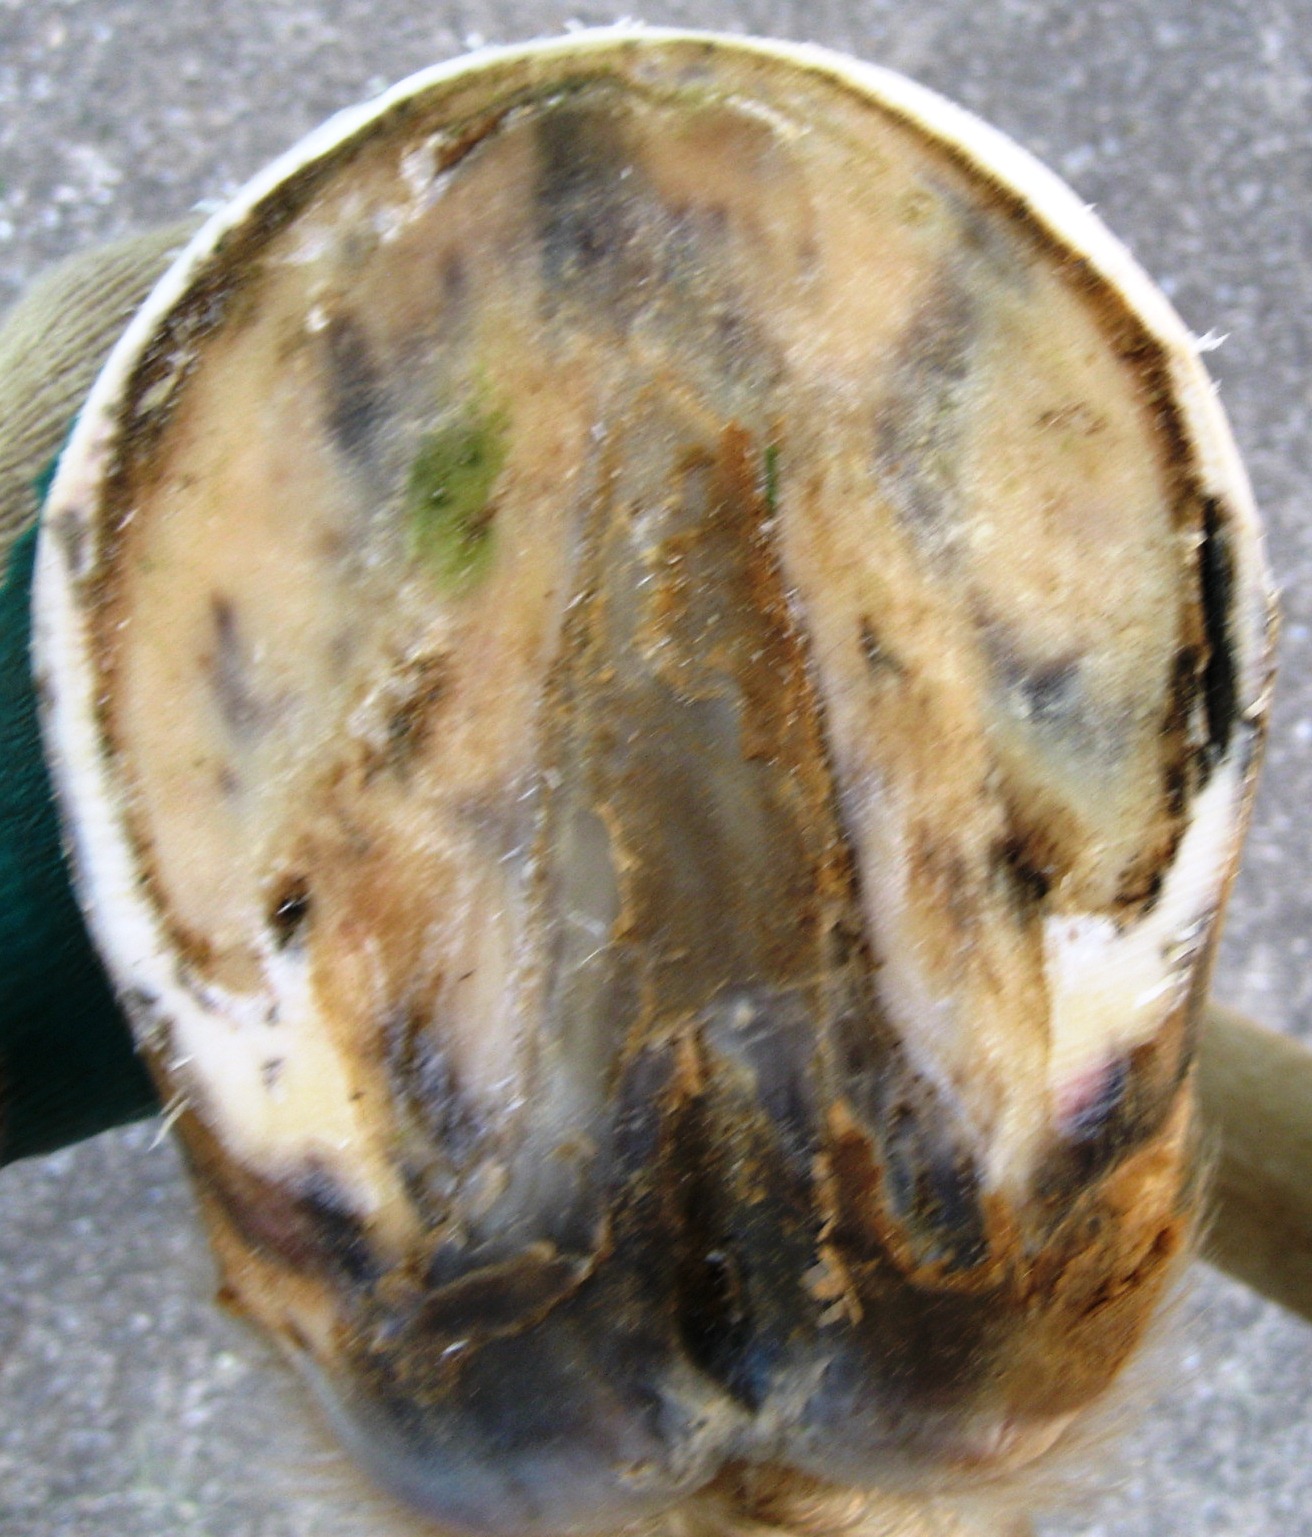
Fig. 16
Treatment:
Basically, treatment consists of 3 steps:
1) detection of the problem
2) thorough exploration of the insult and removal of diseased tissue
3) treatment with suitable agents
Many different treatment agents can be used. Here is a list of some products I either have used myself or have heard good reports about:
Topical agents:
Oregano Oil
Usnea
Silvetrasol
Thrush Stop
Life Data Hoof Disinfectant
White Lightning Gel
Huuf Magic
Vetericyn
Oxine (activated)
No Thrush
Thrush Off
Etc. etc.
Soaking agents:
Oxine AH
White Lightning
Clean Trax
As already mentioned, early detection is the key to a quick and problem free resolution of this type of disease.
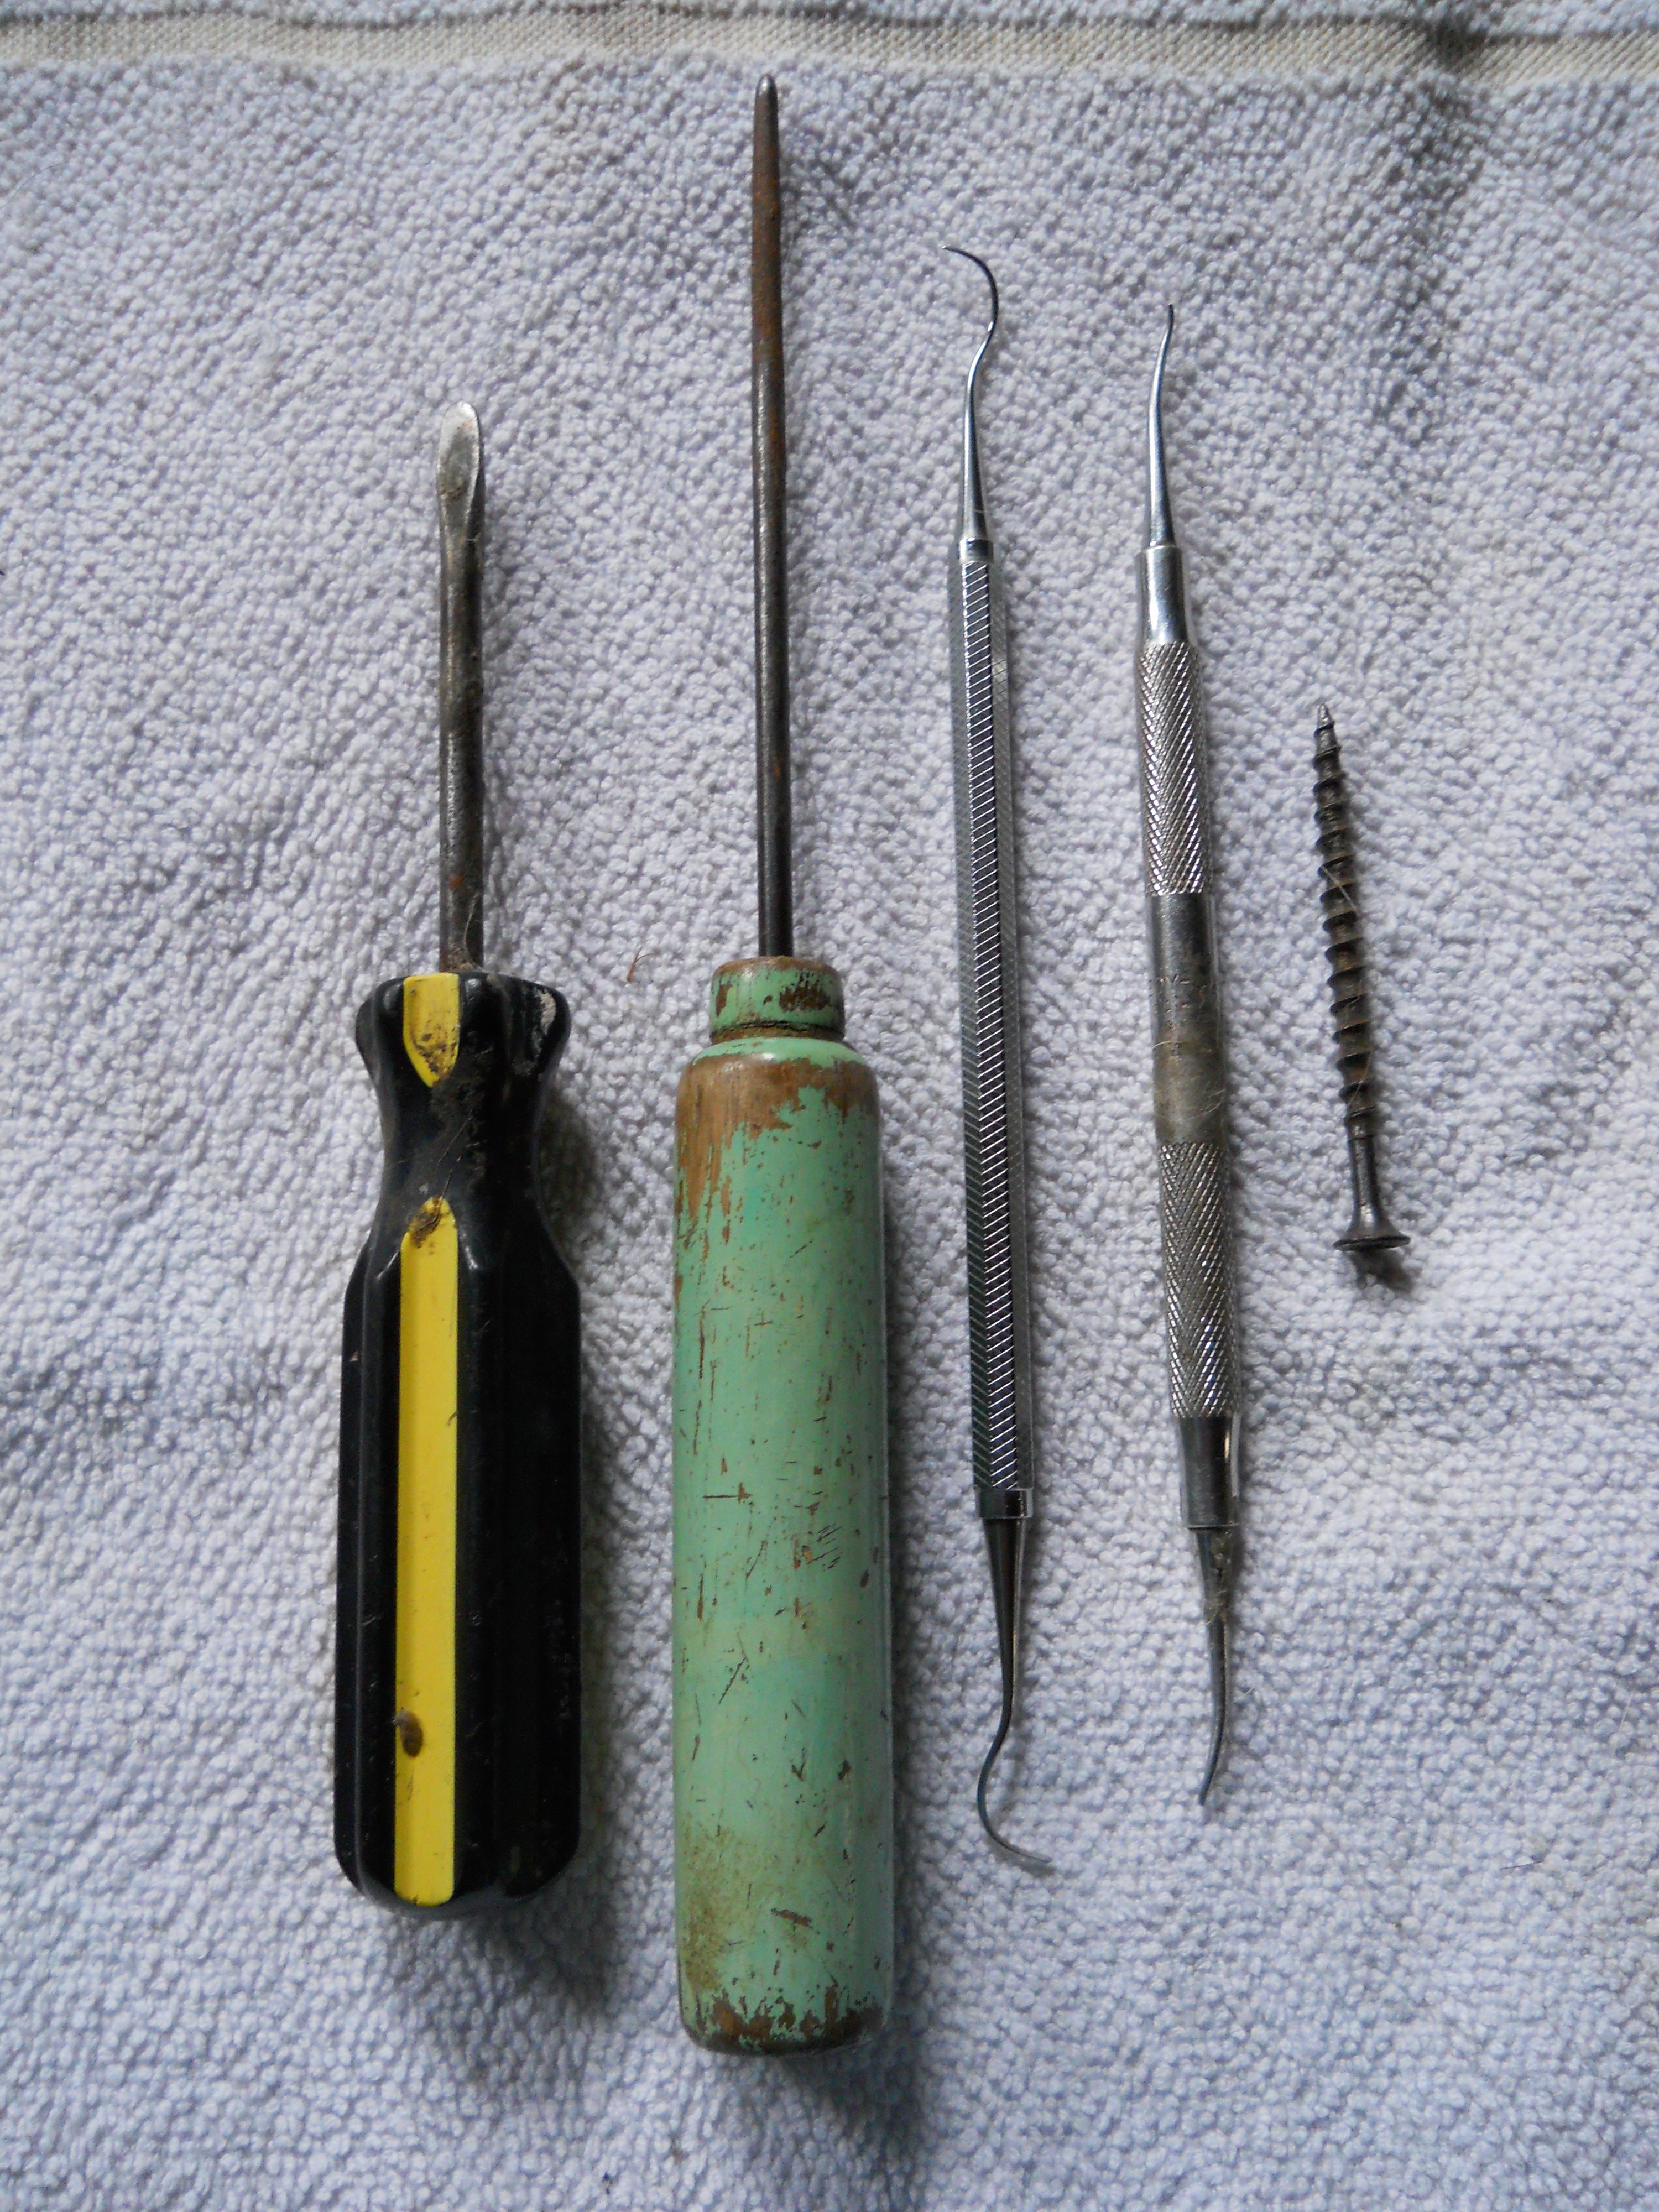
Cleaning out and investigating the depth of even minor appearing insults will insure that nothing is missed. I use several different tools for this. An awl can be helpful, a screw driver with the sharp edges rounded off, dental probes with the sharp tips removed, for very fine cracks an intact dental probe, and in cases of a small but deep cavity, I found a wood or sheet metal screw very helpful to extract the diseased horn and/or debris.
Fig. 17 shows the tools I use
Fig. 17
If the insult is large and deep, first remove as much diseased horn as possible, then the cavity can be sprayed out with a hose with lots of pressure or at the very least irrigated with a syringe, scrubbed with a brush and then dried with a towel or paper towels. For this, I push the towel into the cavity with my screwdriver, pack it in well and pull it out again until it comes out clean and dry.
A large cavity I will always soak with Oxine AH (my preferred soaking agent) for at least the first treatment, at the manufacturer’s recommended strength of 3 to 4 oz of Oxine, activated with 03 – 0.4 oz citric acid for about 3 minutes, then diluted with a gallon of water. Often, I only make half or even quarter the amount, as the activated solution does not stay potent for more than a few hours. The manufacturer recommends distilled water as high iron levels can deactivate the Oxine. Personally, I use well water and it seems to work fine for me. I also have been using Oxine at different dilution rates, activated with vinegar or not activated at all and undiluted, and can’t say that a stronger mix was more successful. Other soaking agents can be used such as White Lightning or Clean Trax.
I do not immerse the entire hoof in the solution, only the sole and cavities. When using activated Oxine it is only important that the liquid stays in contact with the affected area for about 15 minutes.
I like the method of soaking cotton balls in the liquid, then applying those to the sole of the hoof and into or over cavities and inserting the hoof into a boot made of an IV bag. This way, plenty of liquid surrounds the affected area, but it does not drench the whole hoof.
Fig. 18 shows the application of the cotton balls. (For a more in depth discussion of this method please refer to the articles about frog health. They can be found on the Horse’s Hoof website under ……link) Enough liquid will squeeze out from the cotton to soak the sole and crevices of the wall.
Fig. 18

Fig. 19 shows the hoof in the IV bag hoof boot. I put plenty of duct tape around the bottom and let the horse out into the paddock. The boot lasts a long time that way and can be reused over and over.
Although 15 minutes would be enough time for the soak, I prefer to leave the boots on for a few hours just to keep the hoof clean for longer, and allow the movement to really work the liquid into the horn.
Fig. 19

After the soaking treatment, I take a bit off a cotton ball and stuff it into any possible cavity to keep it from collecting dirt and debris. For the first week of treatment, I will attend to the cavity every day, pull out the cotton and disinfect topically with either Oxine again or any other agent listed above. Then I refill it with cotton and apply some more disinfectant until the cotton is fully saturated.
After a week, if the hole appears really clean and/or the crack in the wall that often goes with it did not get any worse, one can reduce the treatment to twice a week or even fill the cavity with Keratex Hoofputty. I have had some really good results with the Hoofputty when the cavity was truly clean and inactive. Then one can practically forget about the hole and let it grow out. However, I have also had cases where there were remnants of disease left and the problem continued undetected underneath the hoof putty until the crack in the outer wall got either longer or did not diminish despite the hoof wall growing out. Hoofputty is not easy to remove from the hole, especially when it is deep, so I don’t use it until I am totally sure that the crack is growing out. It also can be a pain to use. In cold weather it is so hard that it won’t come out of the can, it is brittle and difficult to apply, and I suspect it gets like a hard rock in the cavity itself, possibly being uncomfortable for the horse and deviating the white line. In warm weather it is so sticky that it will stick to anything but where it is wanted and once finally in the cavity it remains soft and picks up all kinds of sand and pebbles. So I usually keep up with the cotton routine, or at least top the putty off with some cotton.
Treatment Examples
Fig. 20 shows 2 distinct cracks in the toe area. With a knife, I cut away as much horn as I feel is safe in order to expose the problem as fully as possible. Then I probe with whatever I feel is the best tool for the job at hand. In Fig. 20 I use the dental probe with a blunt tip. This particular crack proved shallow and quite harmless. I scraped it out as much as possible to allow the treatment agent to penetrate deeply.
Fig. 20
The other crack, as demonstrated in Fig. 21 proved to be a lot more involved. A crack like this I try opening up a bit more with the knife and depending on the size and depth I will clean it out more with the screw as shown in Fig. 22 and Fig. 23 and then treat it, either by soaking it or topically. If the cavity is large enough I fill it with cotton after treatment.
Fig. 21
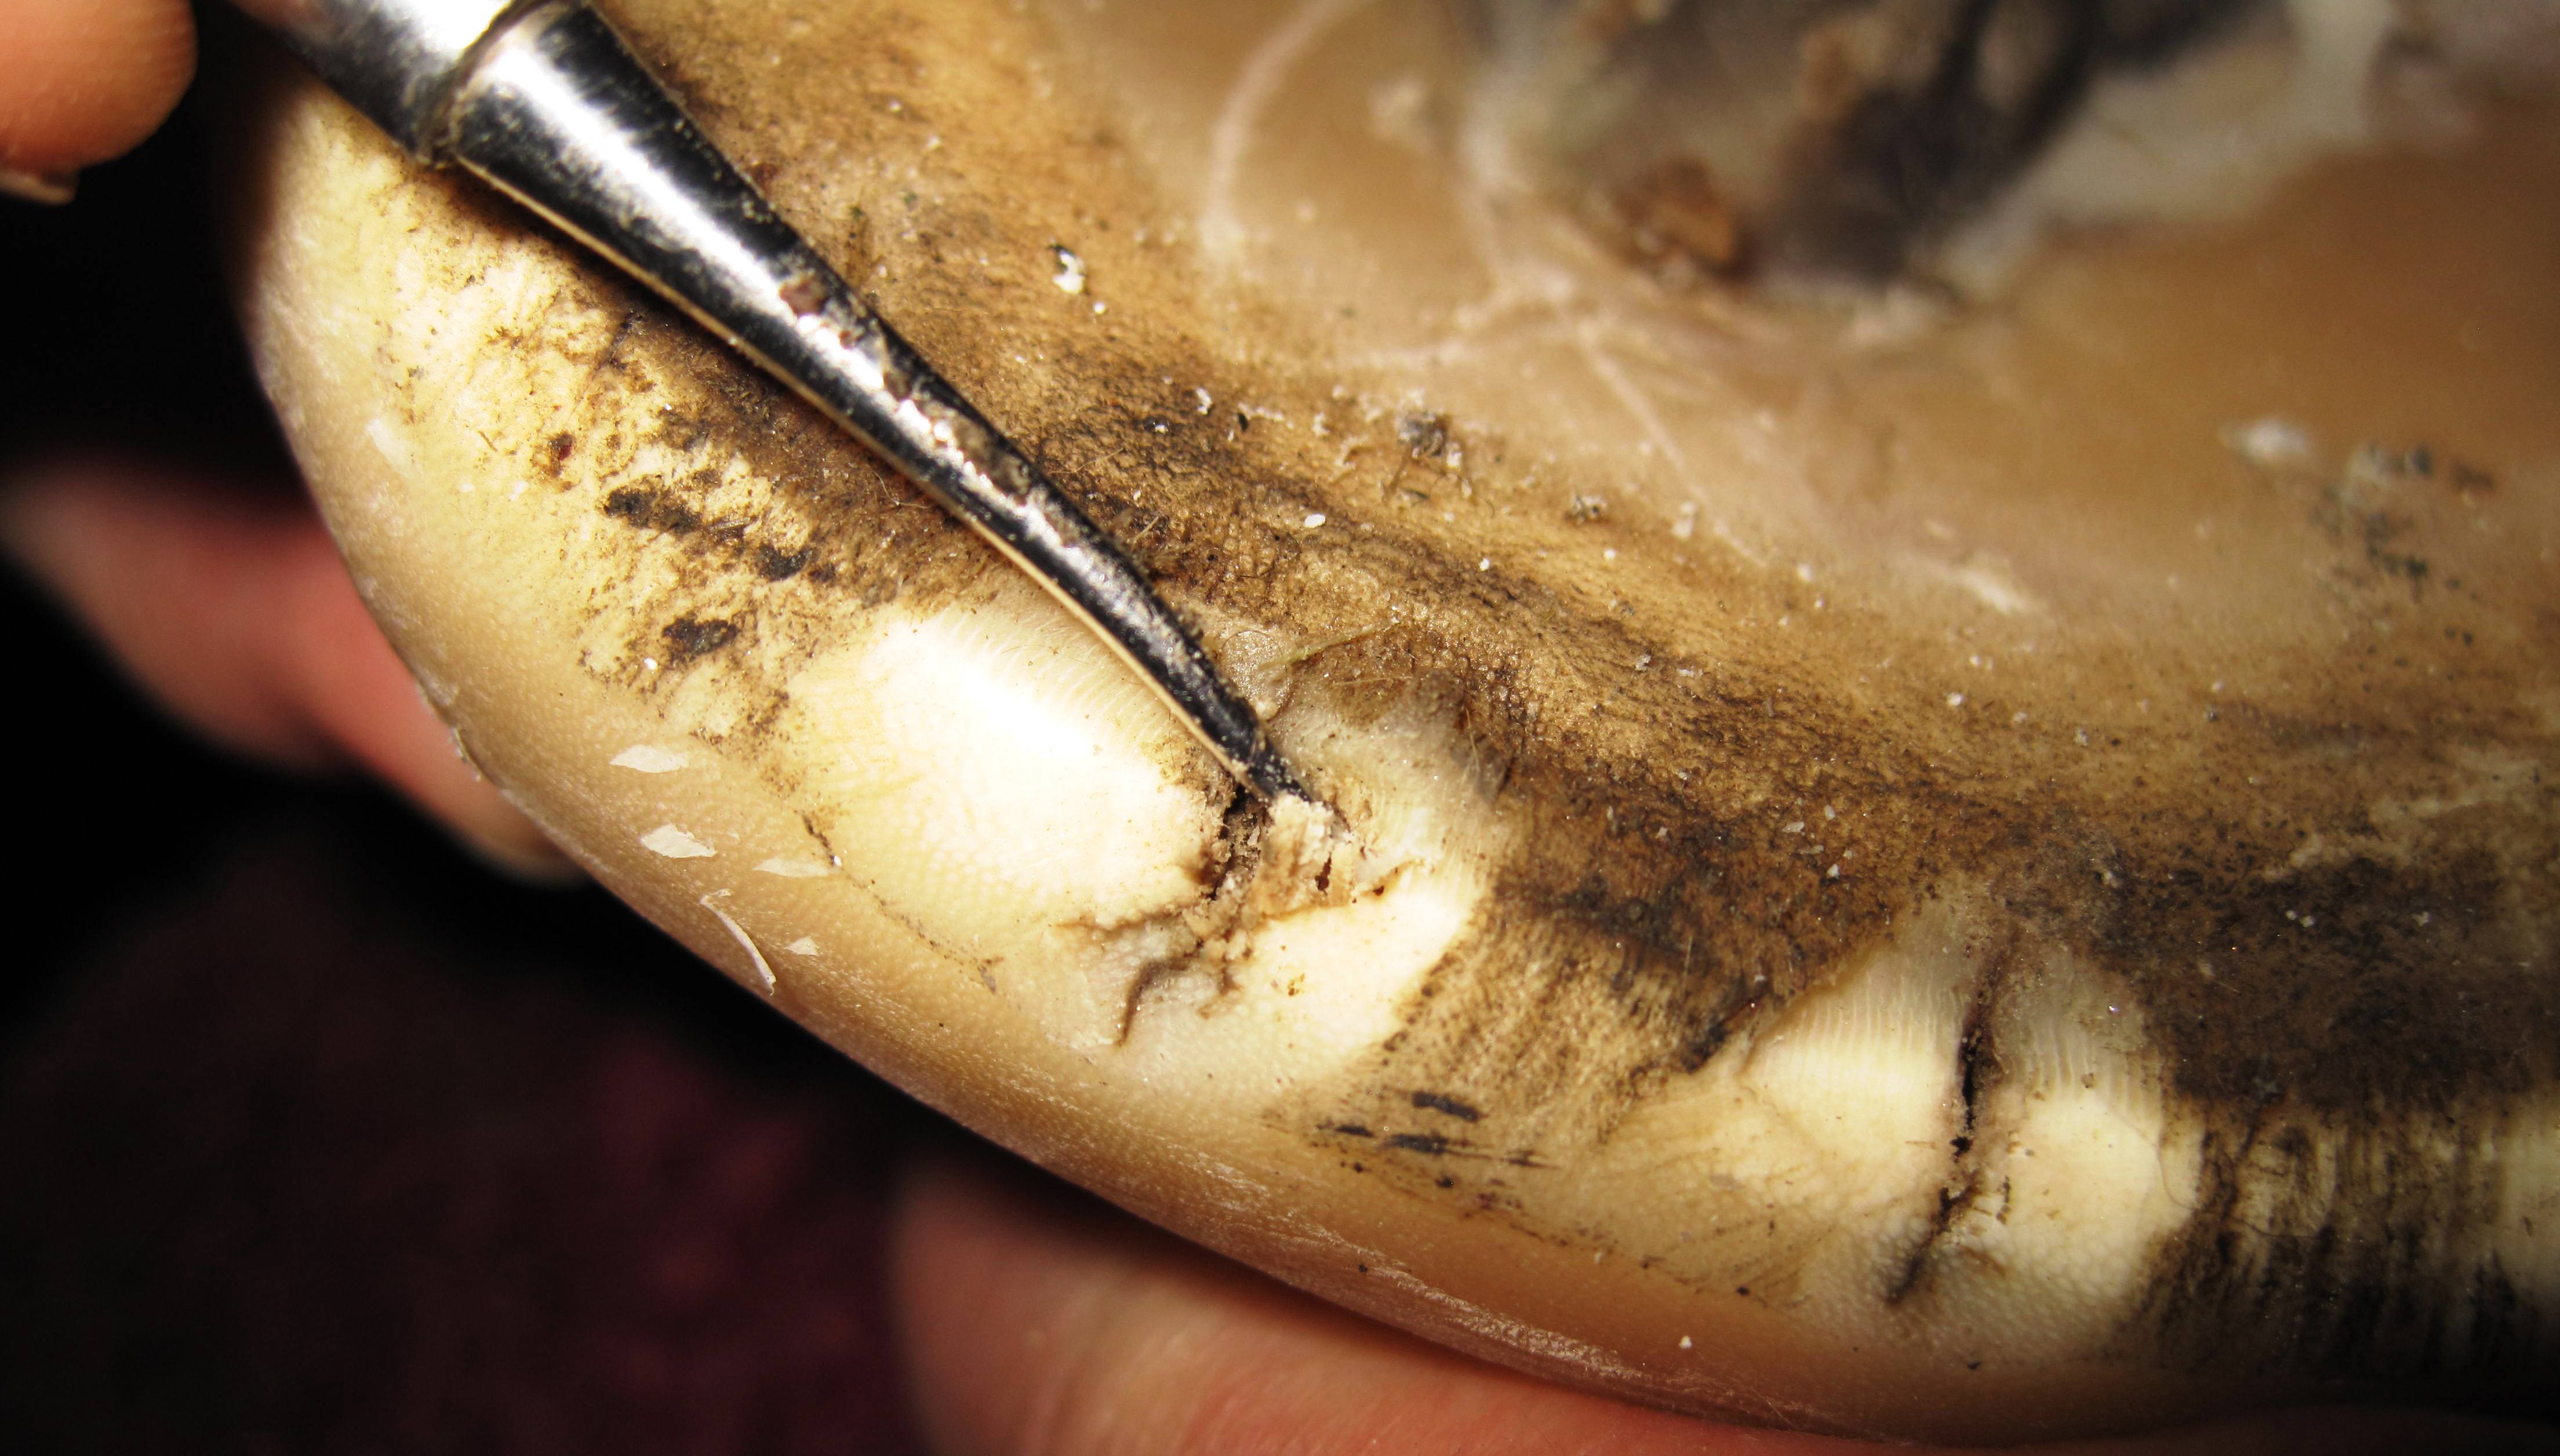
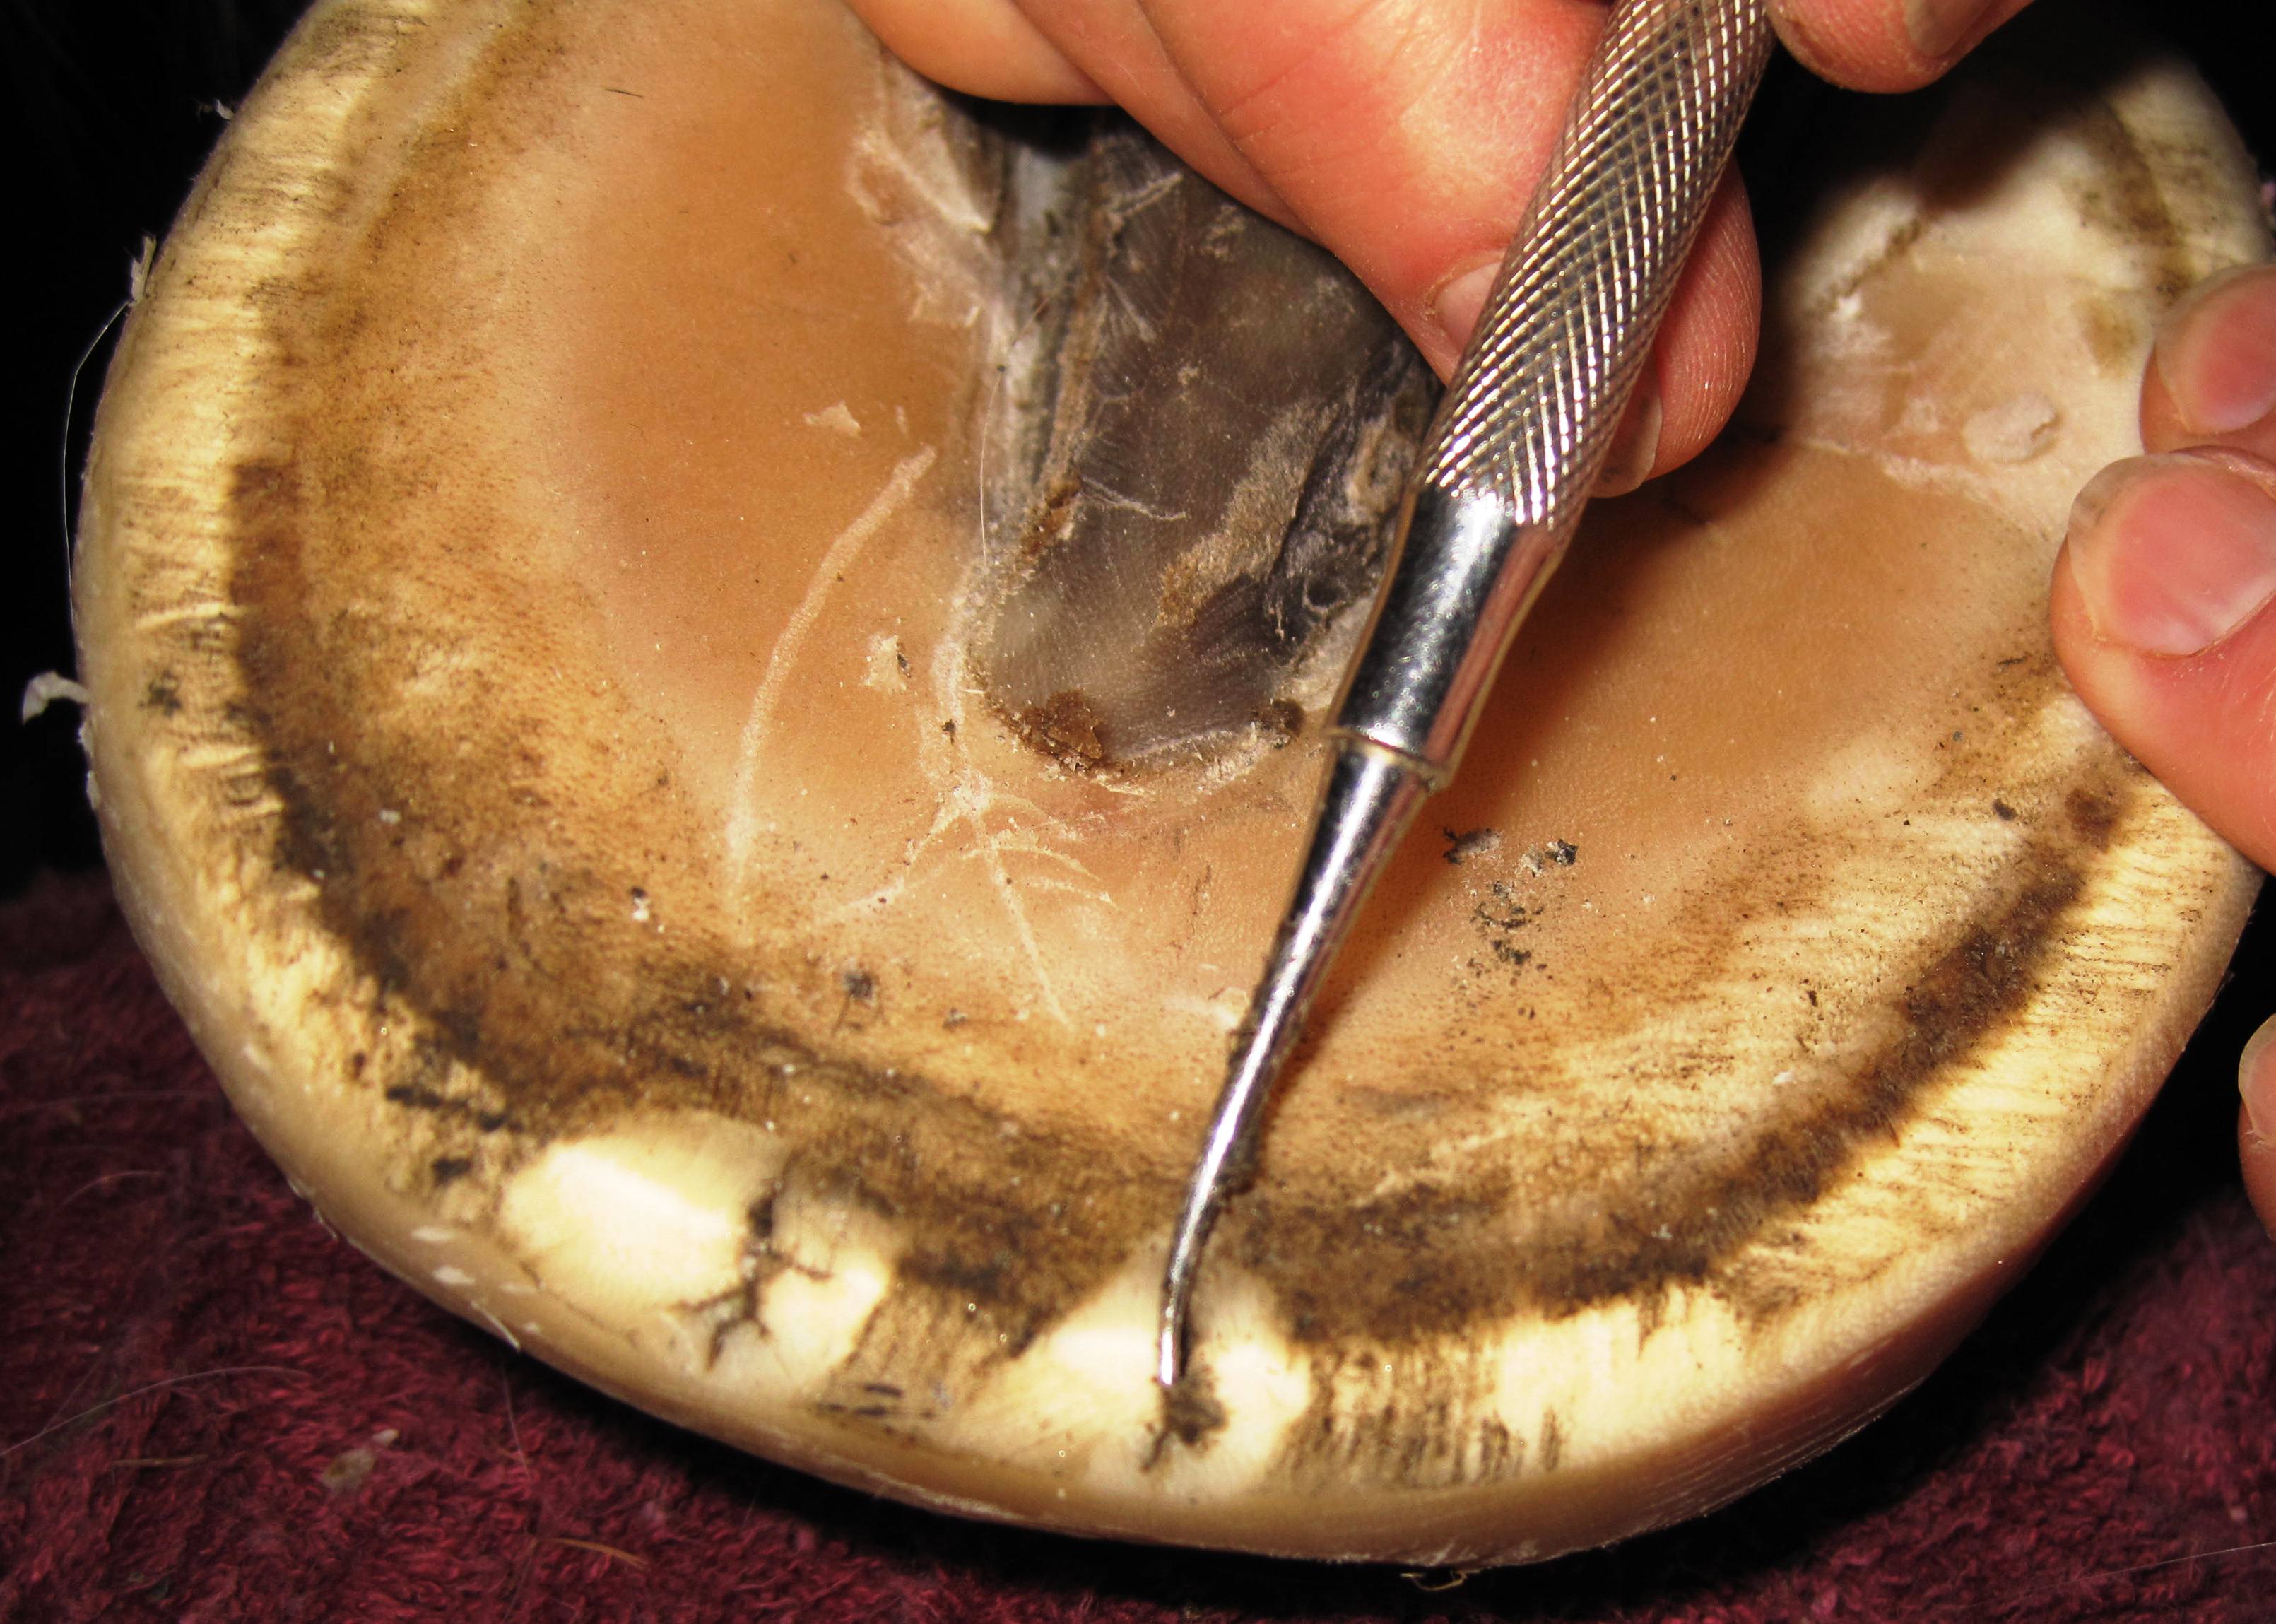
Fig. 22 shows use of the screw to extract diseased material. I literally screw it into the hole and then pull it out. The debris gets caught in the thread, and little by little one can get the hole quite clean without making it any bigger than necessary. But great care needs to be taken not to penetrate into live tissue with the screw. Make sure the screw remains parallel to the wall. I hit corium once, and an abscess was the result with the horse being lame for a few days. I felt so awful for my poor boy.
I keep inserting the screw until it no longer picks up any material. This particular hole I experimented with. It was not very large to begin with, so I did not clean it out like I normally would, just poked around with the screw driver, and treated it about once a week topically with Oxine, Silvetrasol and No Thrush alternately and kept it closed with cotton. This same hole has been there now for about 4 months and barely gotten smaller. This proved to me that cleaning it out as much as possible before any treatment is crucial to a quick resolve. I had to insert the screw about 6 times to clean out this small hole, and then I still used the screw driver and dental probe. It will be interesting to see the progress from now on.
Fig. 22

Fig. 23 shows how the diseased horn clings to the thread of the screw. Of course I clean it after each insertion.
Fig. 23

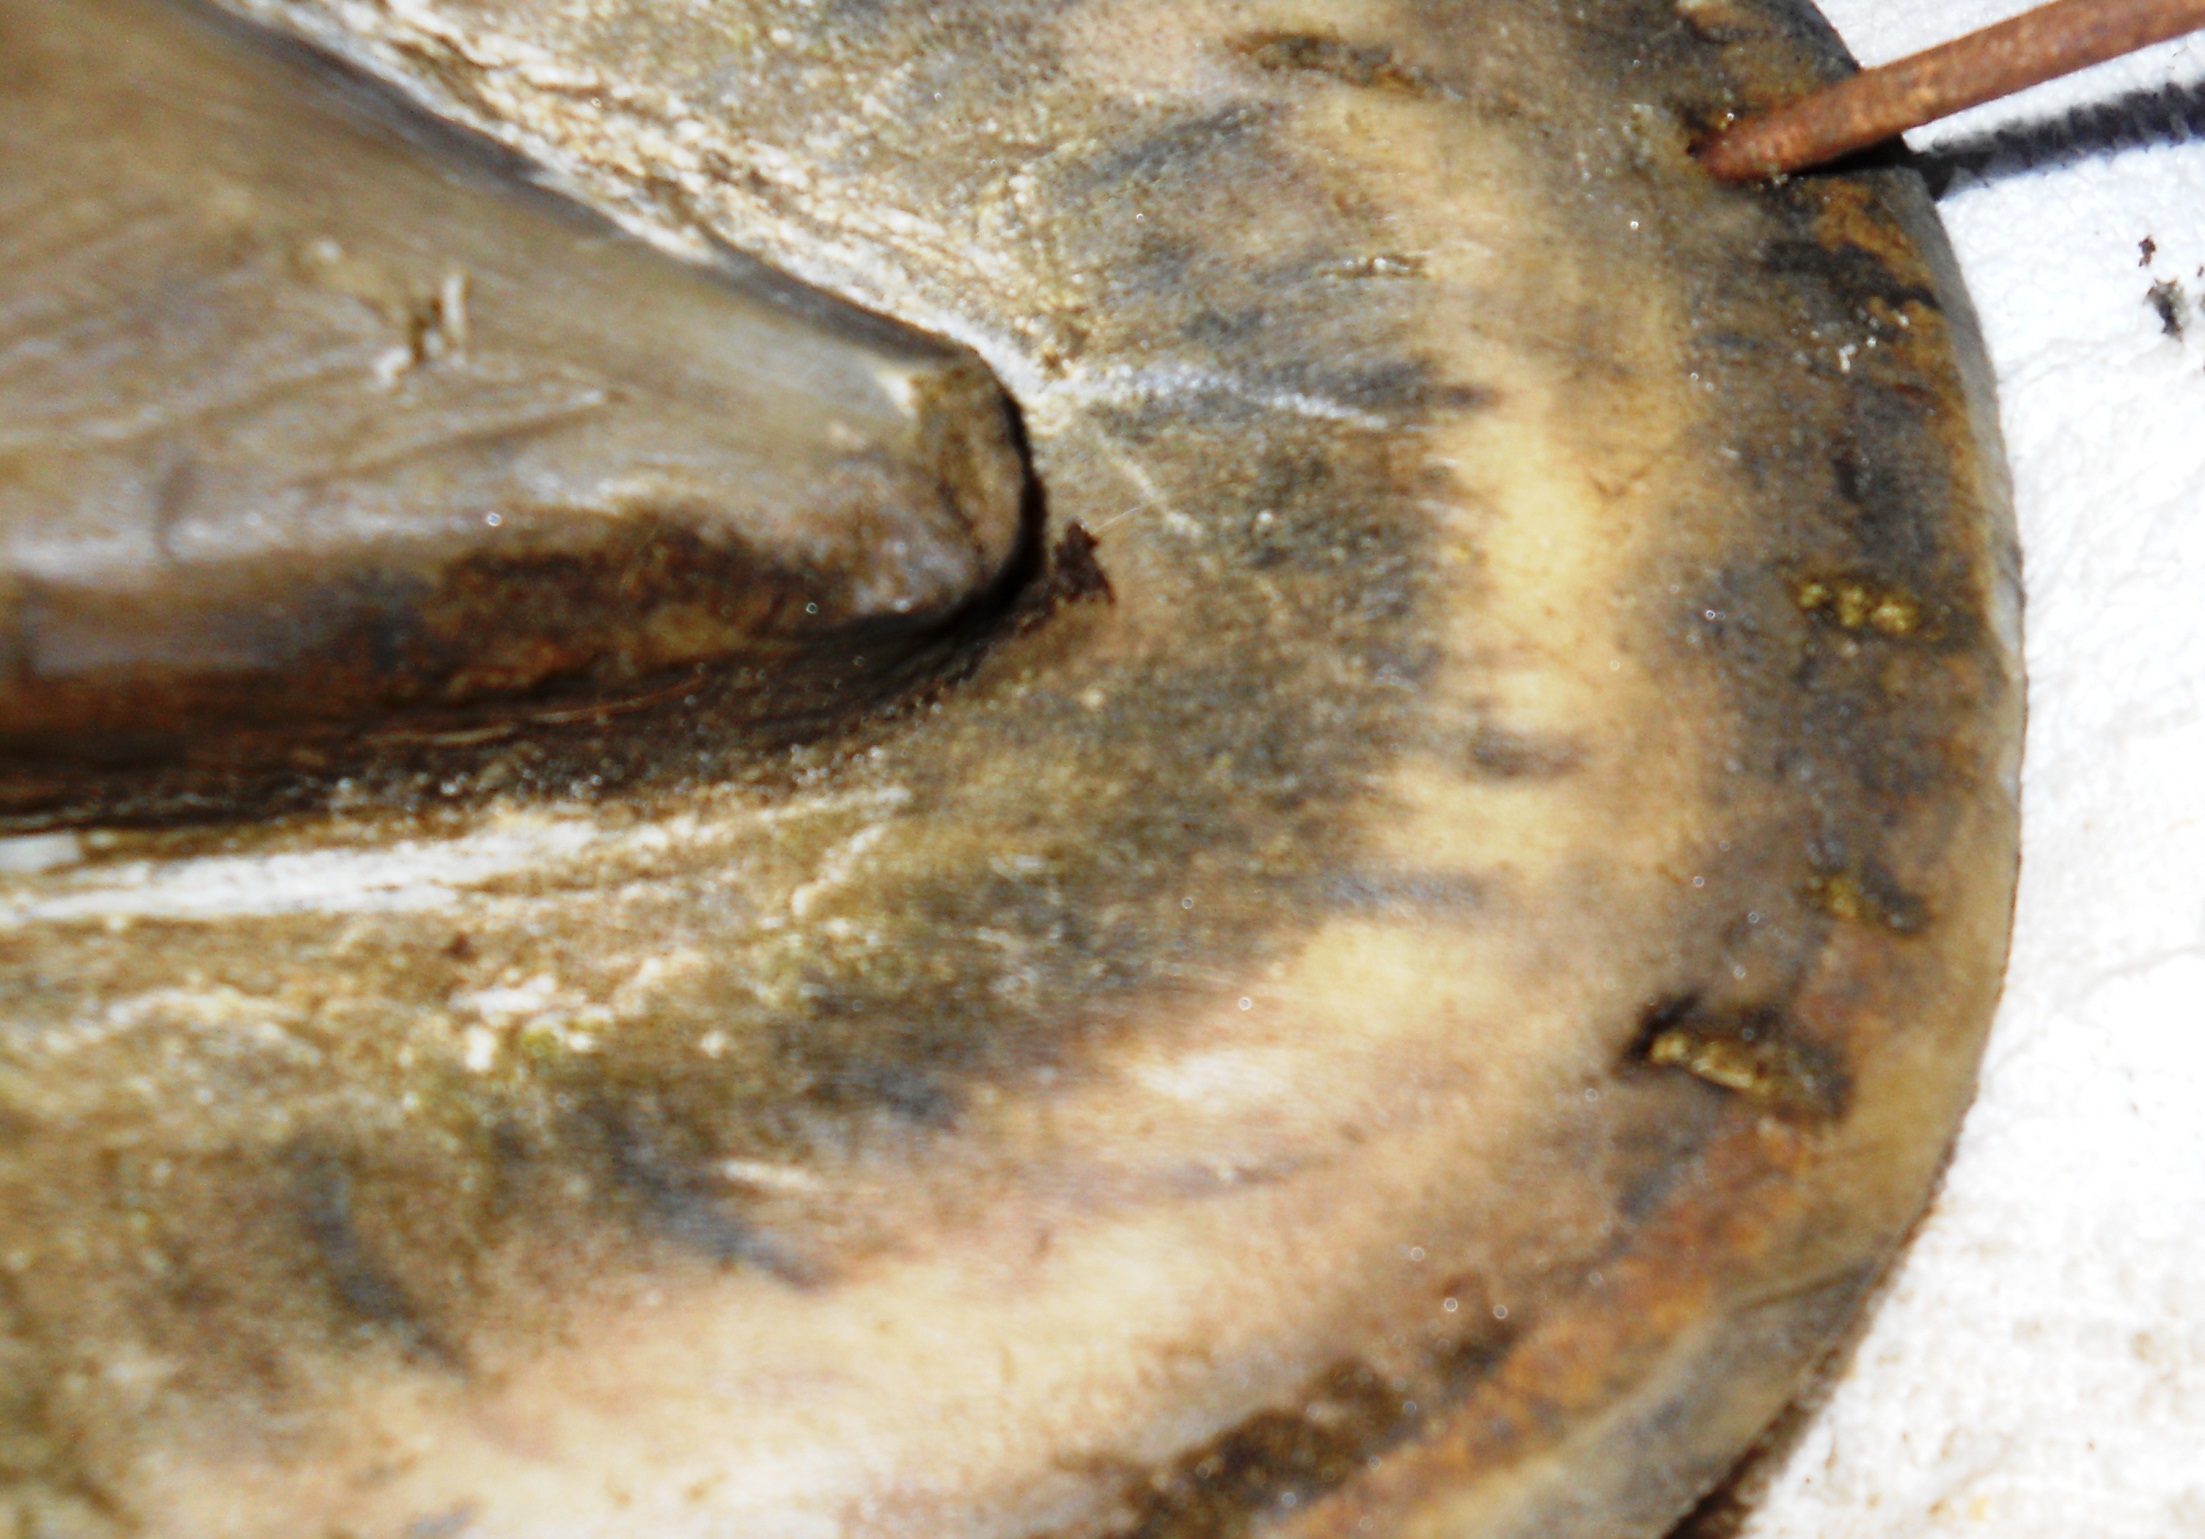
Fig. 24 shows another array of potential holes. All except the last crack proved shallow and harmless. I used the awl for probing, and its tip disappeared into a hole about ¼“ deep.
Fig. 24
This hole did not seem to require the screw, so I just used the screw driver to loosen and clean out any crumbly horn. Then I applied activated Oxine to the entire surface of the hoof as the frog needed some help as well and stuffed the hole with cotton. After applying the cotton, I saturated the cotton one more time with Oxine. Fig. 25 shows the cotton filling the hole. Often this one time treatment is plenty for a hole of this size, but just to be sure, I usually repeat it in a few days. Sometimes I let the Oxine or other liquid treatment dry a bit and then I fill the hole, cracks or crevices with No Thrush as an added precaution, esp. the ones that are too small to hold cotton.
Fig. 25
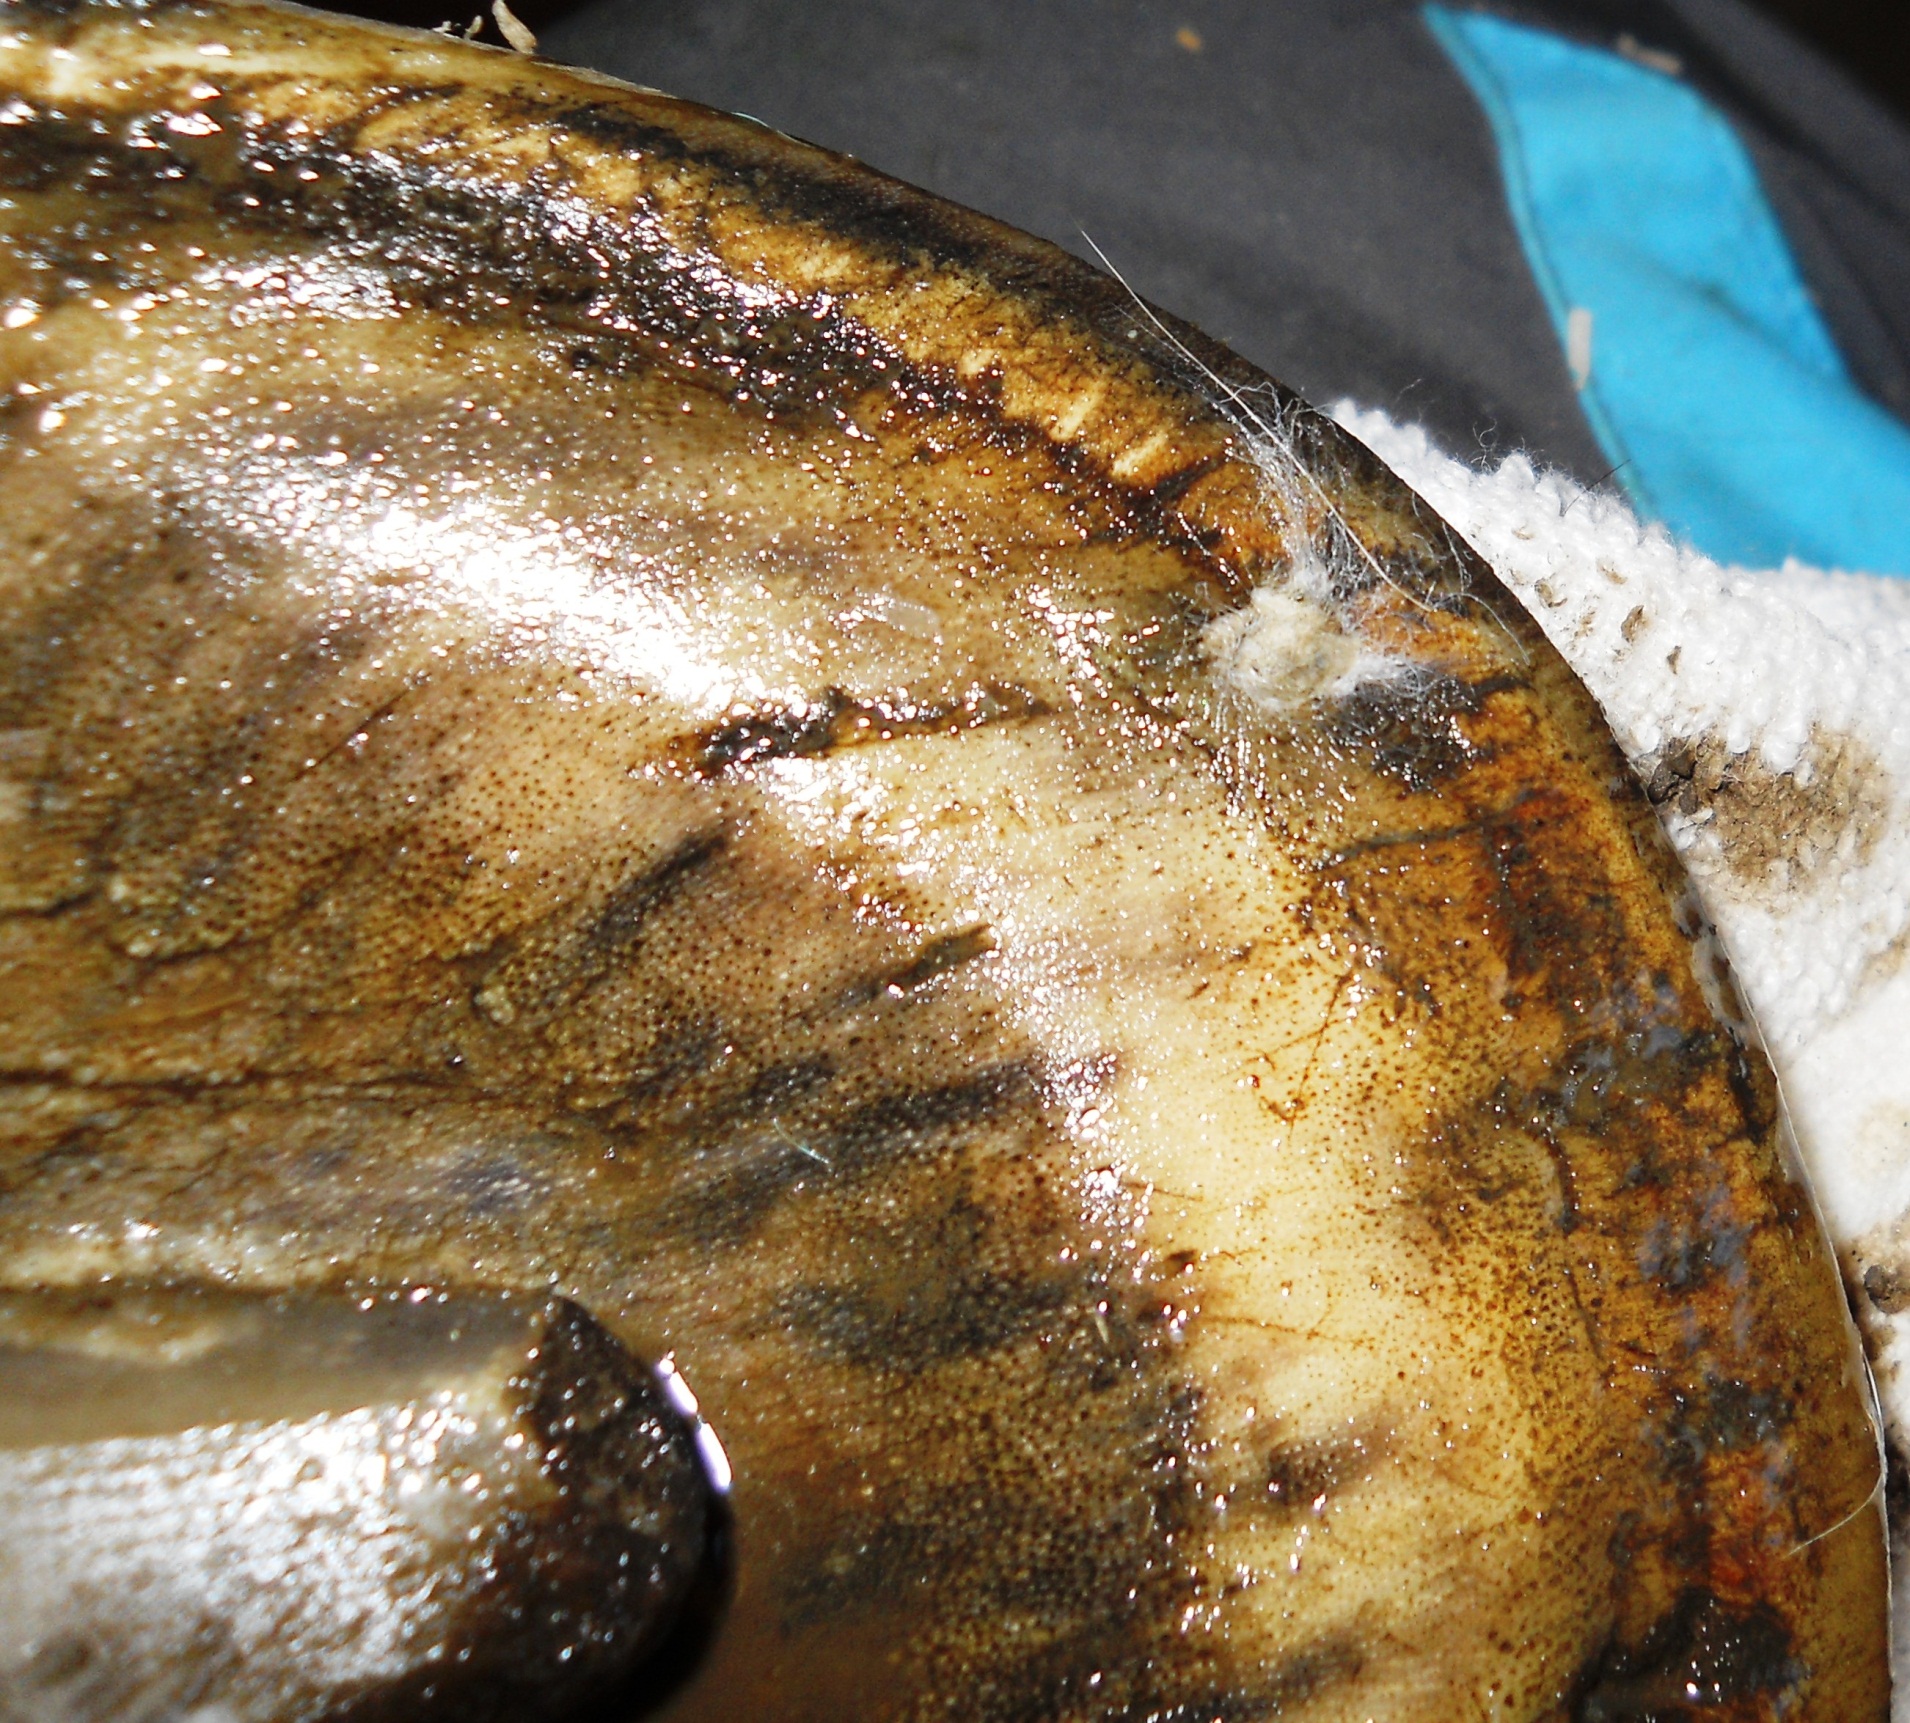
Fig. 26 shows a winter ravaged hoof, very typical for where I live. There is bruising in the frog, the frog has some disease, and the white line on the top of the picture has deteriorated to the degree of forming a groove. This type of channel happens a lot in the spring as the feet go from winter mode with enormous concavity from the snow pack to the summer mode with a much flatter sole. A lot or restructuring is happening in a short time, often resulting in this phenomenon. In this photo, I had already cleaned out and thoroughly probed both the white line area and the toe crack. The toe crack proved to be quite benign at this point and only required topical treatment
As I mentioned earlier, true white line deterioration does not appear to be the same as inner hoof wall disease, but I do treat it in the same way just to make sure, and to keep dirt and pebbles from working their way further up. If this were an inner wall insult like in Fig. 3 or Fig. 15 and 16 , I would treat it exactly the same.
Fig. 26

Fig. 27 shows the same hoof, here painted with Silvetrasol, and a prepared piece of cotton that I press securely into the white line channel. It is not necessary to fill the entire channel, matter of fact if too much cotton is used it often does not stay put. It is only important to protect the base of the groove.
Fig. 27
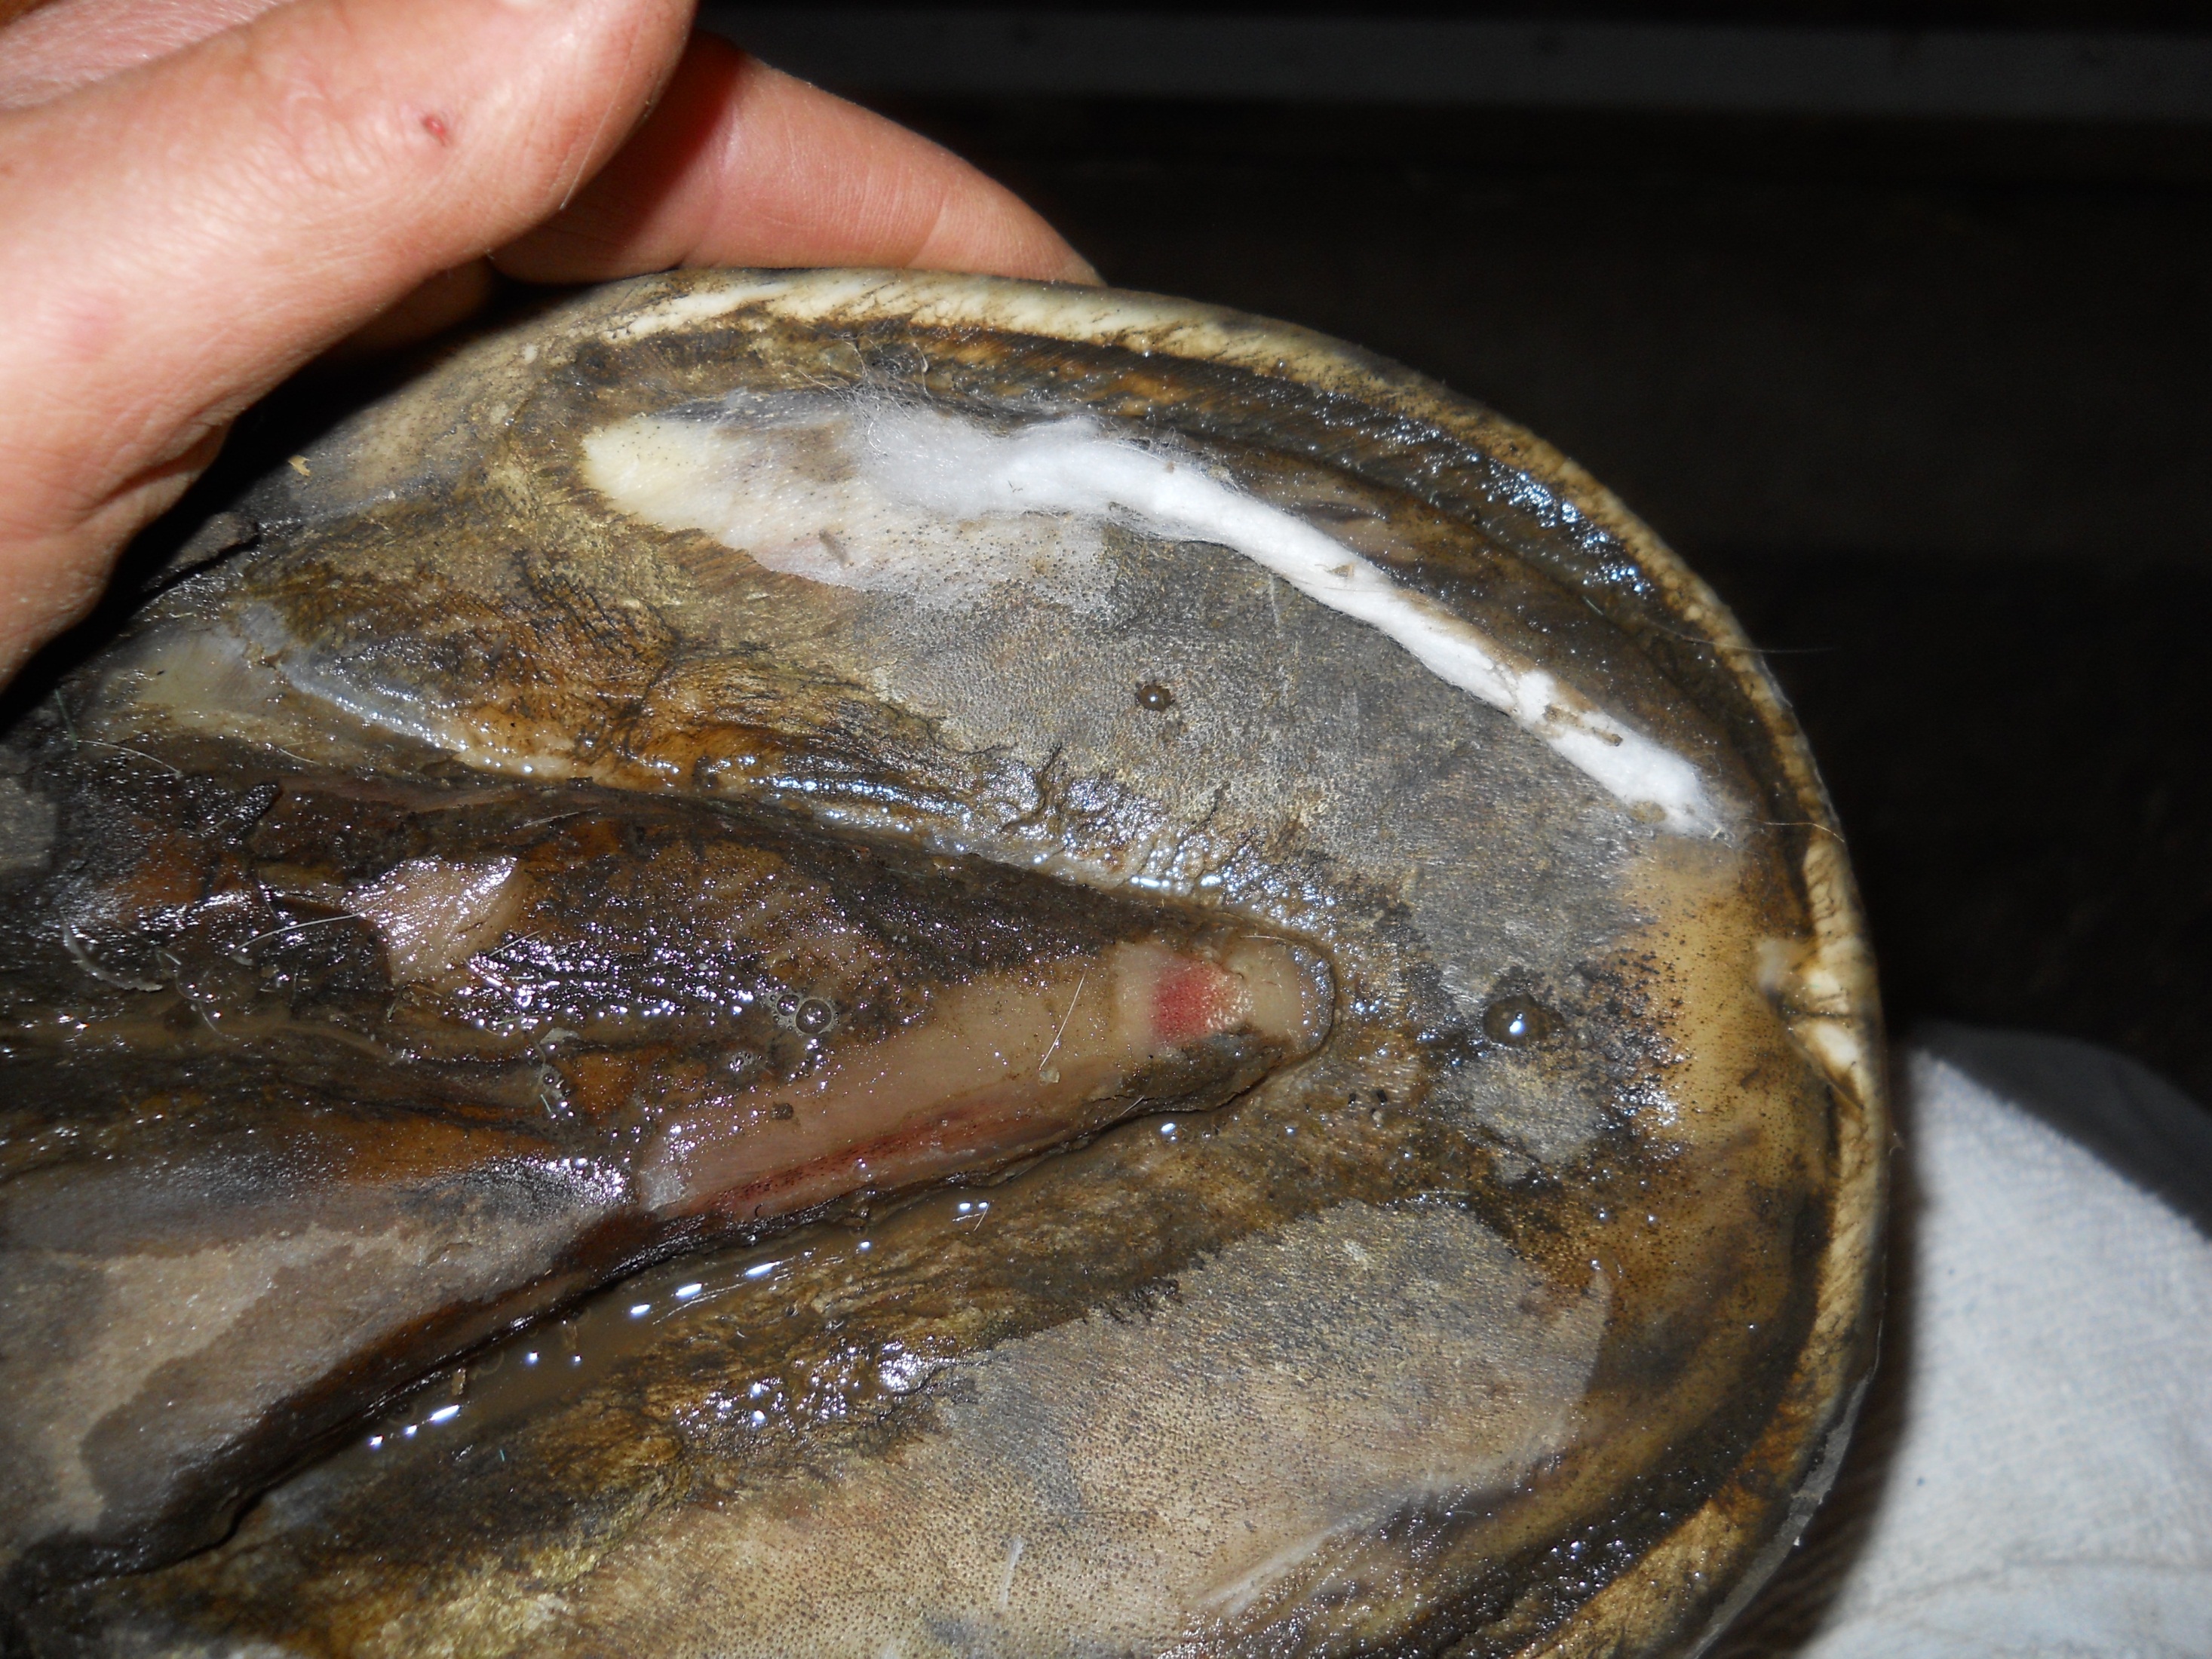
Fig. 28 shows the same hoof with cotton in place.
Fig. 28
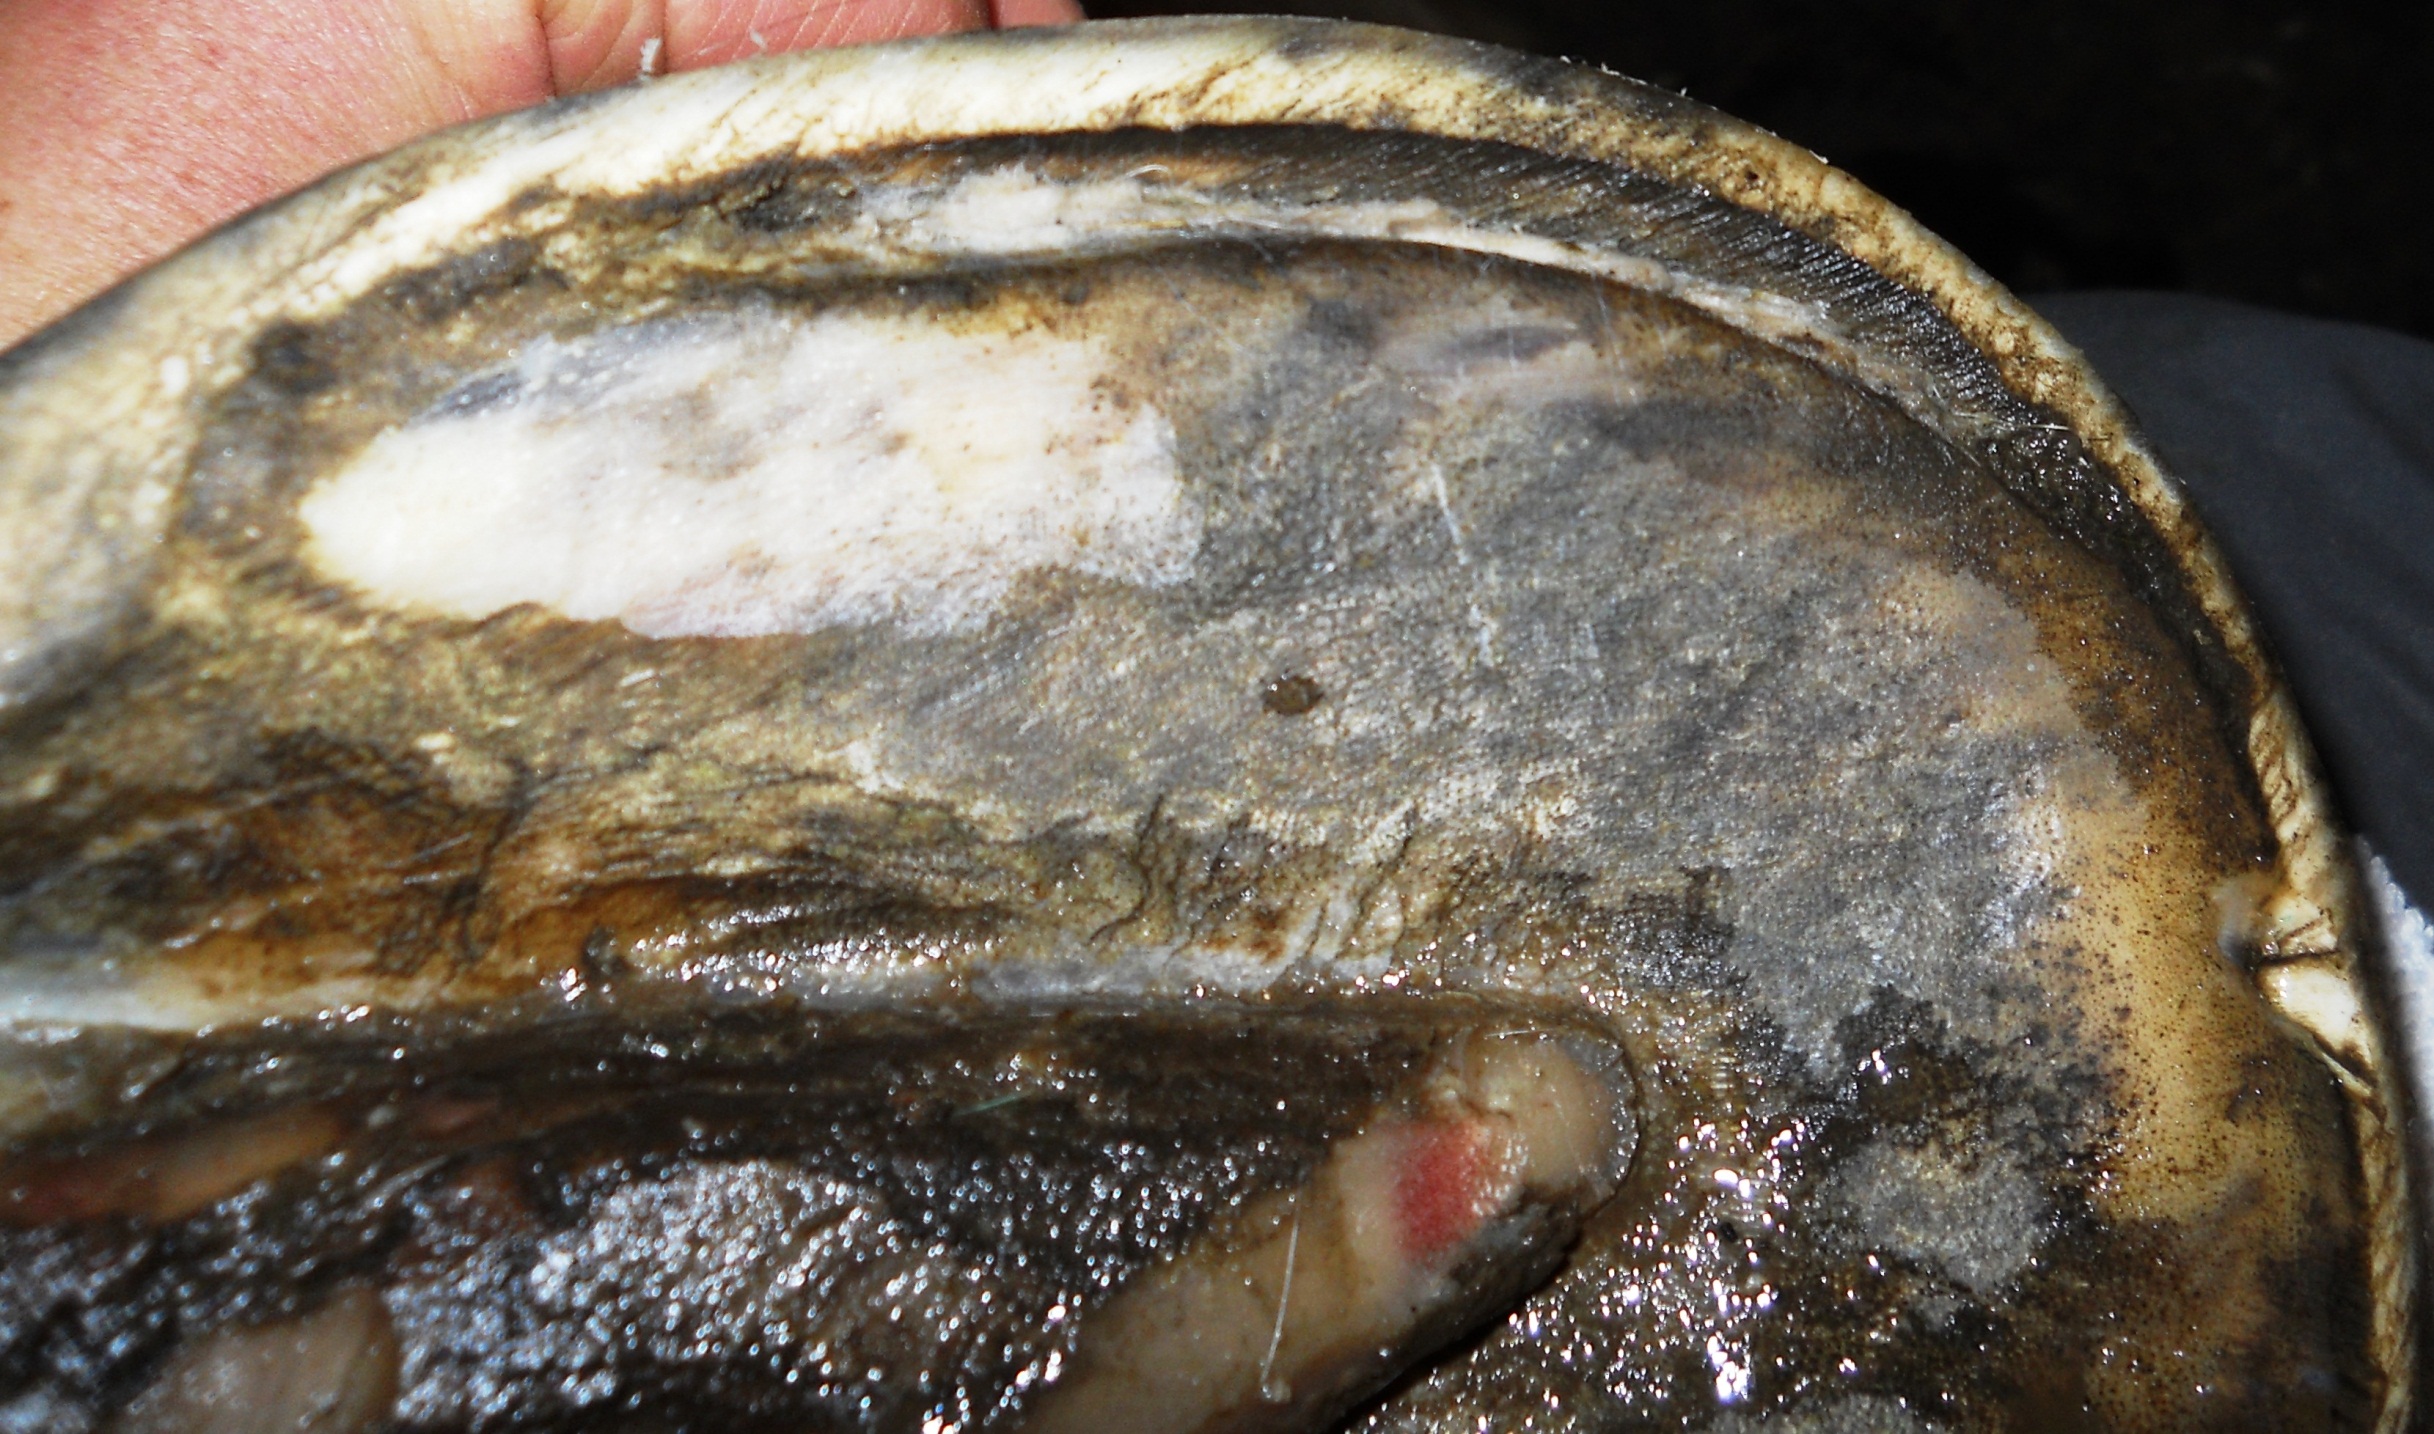
Fig. 29 shows the same hole described in Fig. 11 and the adjacent white line deterioration. The cotton from the previous treatment has been removed and the hole is clean and ready for the new treatment.
Fig. 29

Fig. 30 shows the treatment for the problem in Fig. 29. I applied Silvetrasol, filled the hole with cotton and put some more disinfectant on top to make sure the cotton is fully soaked.
Fig. 30

Fig. 31 shows the hoof that was mentioned in Fig. 5. This is the only time that I had a hole that deviated the white line deep down into the sole. I had this hole filled with Keratex Hoofputty, and I believe this was the problem. It happened during the winter, which is very cold here in Vermont, so the putty would have been like a rock. The infection also got worse underneath the putty. After removing it and only using cotton, the white line did not return to its original place and the sole remained being raised around the hole area. Eventually I got improvement by cutting the white line as deep down as I dared, which of course made the whole insult even bigger, but gradually, by continuing to do this, normal growth returned. Unfortunately I have no continuous documentation of this. Fig. 32 shows the same hoof a year later, in excellent health, about the same time of year.
Fig. 32
To this date, I have not figured out how one can totally prevent all these cracks from happening in the first place. For 3 years now, my horses have been on balanced minerals according to hay, soil and forage tests and on a low sugar and starch diet. Unless I am doing something very wrong in regard to amounts or there is another deficiency I have not yet detected, I don’t think it has anything to do with diet. It may be the environment. I used to live in Connecticut and did not have these particular hoof problems. The land my horses are on now has been farmed for many years and fertilized with cow manure. Since hoof rot is very prevalent in cows, I am wondering if these organisms could be present in the soil in large numbers. But then again, horses that don't live on grass have the same problems, and not just in wet environments. I have seen the same problems in horses that live in very arid conditions (Spain and Israel).
Additionally, Dr. Stephen O'Grady has written a good article on white line disease (WLD; http://www.equipodiatry.com/wldupdt.htmand) where he states that the agents normally cultured from diseased tissue are aerobic bacteria and fungus. Fusobacterium necrophorum on the other hand is the bacteria that supposedly causes foot rot in cows and thrush in horses. F. necrophroum is anaerobic.
Here is a paragraph from Dr. O’Grady’s article:
"Infectious organisms, bacteria, fungi or a combination of the two have been continually incriminated as a cause. What is not known is whether these organisms are primary invaders or secondary opportunists. Given the nature of these pathogens usually isolated (mixed flora of bacteria, Pseudoallsheria and Scopulariopsis fungi) they are most likely secondary opportunists, which further damage an existing hoof wall separation. The fact that WLD can be resolved with debridement alone further detracts from this as a primary cause."
So until the root cause can be detected and eradicated, I believe the only other good solution is timely detection and treatment.